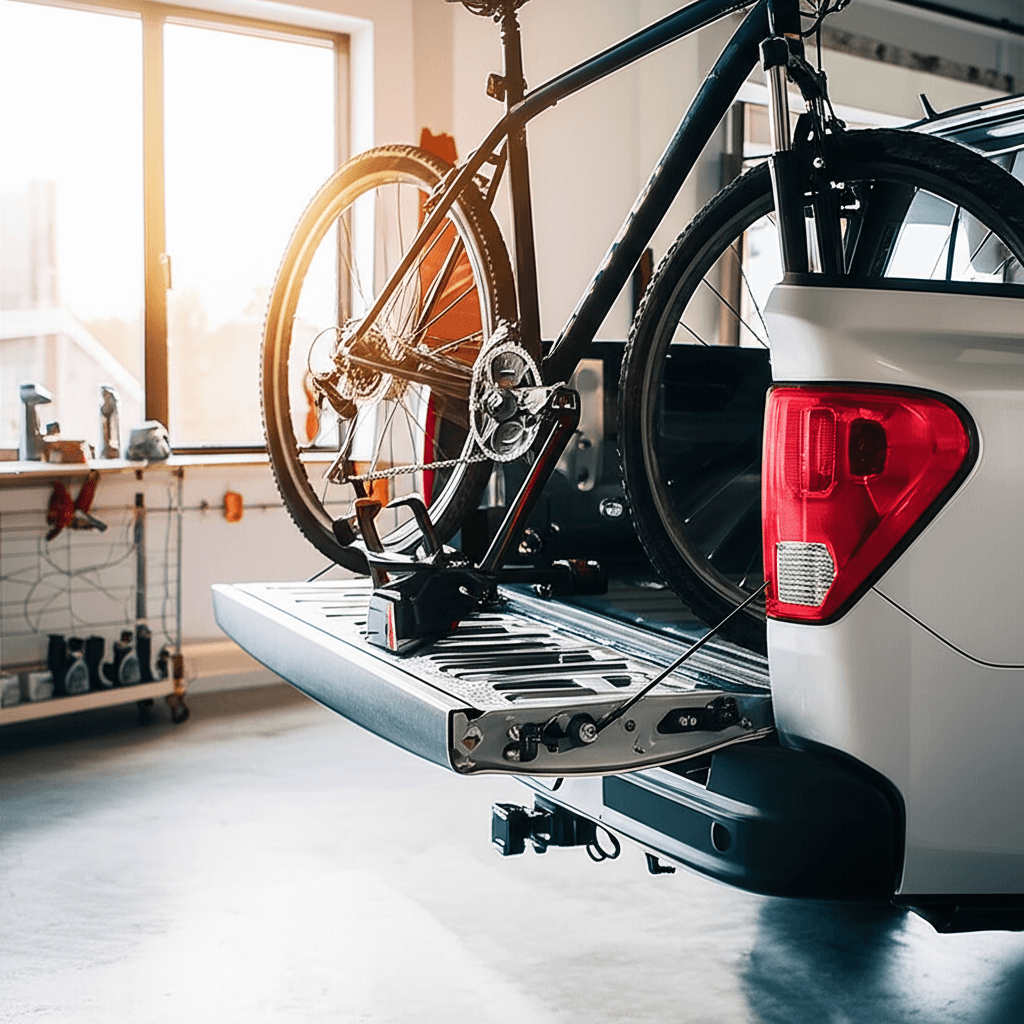
Truck bed bicycle fork mounts are a secure and straightforward way to transport your bikes in your truck’s bed. They keep your bikes upright and stable, protecting them and your vehicle from damage, making them essential gear for any cyclist who owns a truck and loves to explore.
Hey there, fellow road warriors and trail chasers! Ever wrestle with how to get your beloved bikes from home to the trailhead without a hitch? You’ve got a truck, which is awesome for hauling gear, but bikes can be a bit finicky. You don’t want them bouncing around, scratching your paint, or worse, getting damaged. It’s a common puzzle for truck owners who love to ride. But don’t sweat it! Getting your bikes safely secured in your truck bed is easier than you think, and truck bed bicycle fork mounts are the secret weapon. I’m going to walk you through everything you need to know, so you can spend less time worrying and more time riding.
Why Truck Bed Bicycle Fork Mounts Are a Game Changer
So, what makes these fork mounts so special? Imagine this: you pull up to your favorite riding spot, and your bikes are exactly where you left them – upright, secure, and looking just as good as when you loaded them. That’s the magic of a good fork mount. They’re designed to grab a bike by its fork (where the wheel attaches) and hold it steady in your truck bed. This means no more leaning bikes against the sides, no more tying them down precariously, and definitely no more taking up precious cab space or risking damage to your car’s interior. They’re a simple yet incredibly effective solution for keeping your two-wheeled steeds safe and sound on any journey.
Benefits You’ll Love
Let’s break down why these mounts are such a no-brainer for anyone who transports bikes in a truck:
- Unmatched Security: This is the big one. When properly installed, fork mounts lock your bike in place, preventing movement even on bumpy roads. This protects both your bike and your truck bed from scratches and dents.
- Space Efficiency: Bikes are stored vertically in the truck bed, using significantly less space than if they were laid down. This leaves room for other gear, like camping equipment, coolers, or your riding buddy’s bike!
- Easy Loading and Unloading: Most fork mounts are designed for quick installation and removal of your bike. A simple quick-release lever on your bike’s front wheel makes the process fast and fuss-free after the mount is set up.
- Bike Protection: By keeping bikes upright and separated, fork mounts minimize contact points, reducing the risk of cables rubbing against frames or pedals scratching paintwork.
- Versatility: They work with a wide range of bicycles, from mountain bikes to road bikes, as long as you have the correct fork drop-out size.
- Cost-Effective: Compared to some other bike transport solutions, fork mounts are generally more affordable, especially considering their durability and effectiveness.
For truck owners, these aren’t just accessories; they’re essential gear that simplifies your adventures and protects your valuable equipment. They truly transform how you carry your bikes.
Understanding Truck Bed Bicycle Fork Mounts
At its core, a truck bed bicycle fork mount is a device that attaches to your truck bed and securely holds your bicycle by its front fork. To do this, you first remove your bike’s front wheel, then insert the fork’s dropouts into the mount. Most mounts feature a locking mechanism that clamps down on the axle, holding the fork firmly in place. This keeps the bike upright and prevents it from tipping over or sliding around.
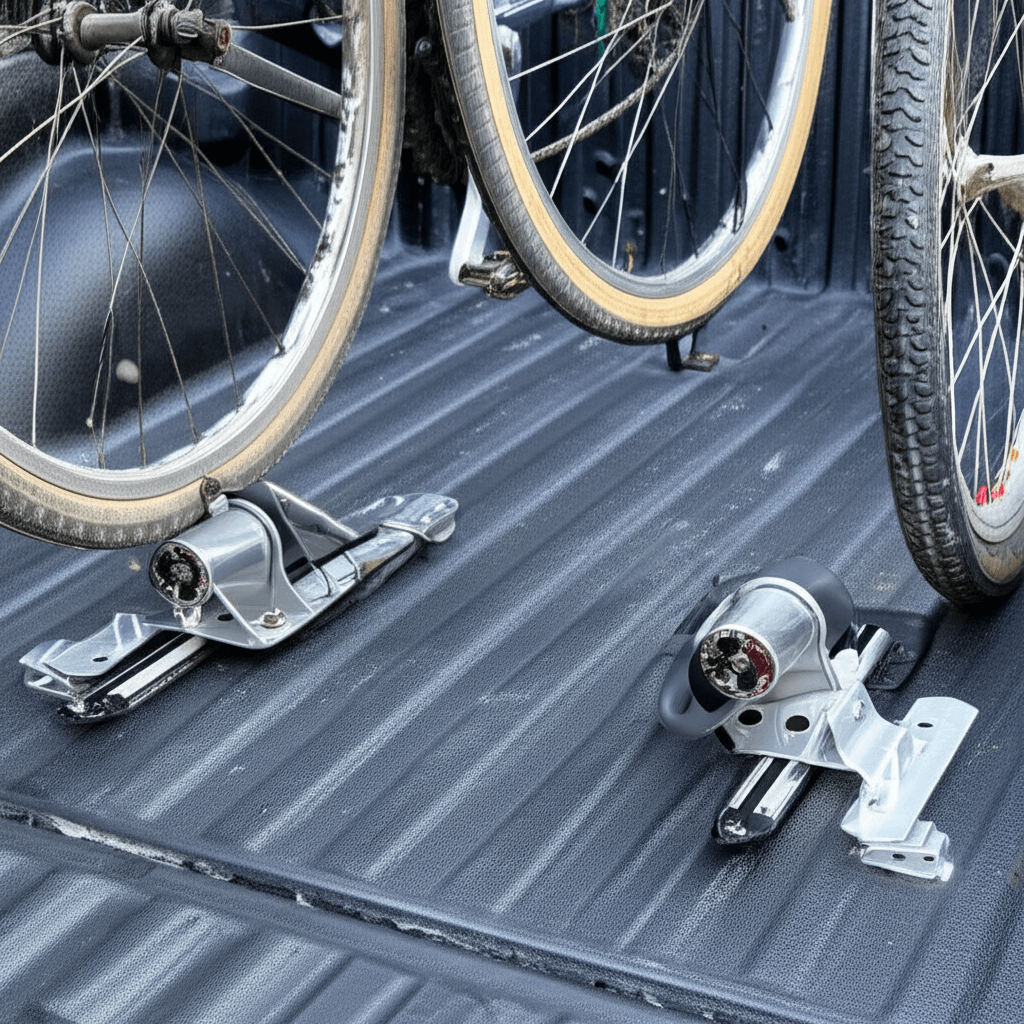
The Anatomy of a Fork Mount
While they might look simple, fork mounts have a few key components:
- Base Plate: This is the sturdy bottom part that attaches to your truck bed. It can be made of metal (like aluminum or steel) and is designed to be bolted or clamped down.
- Fork Clamp/Dropout Holder: This is where your bike’s fork sits. It’s designed to accommodate standard bicycle fork dropouts, typically 9mm quick-release or 12mm-20mm thru-axles.
- Locking Mechanism: This is the crucial part that secures the fork. It can be a lever, a bolt, or a quick-release mechanism that tightens around the axle or fork.
- Mounting Hardware: This includes all the bolts, nuts, and brackets needed to secure the base plate to your truck bed.
Types of Fork Mounts
You’ll find a few main styles of fork mounts, each with slight variations:
- Direct Bolt-On Mounts: These are the most common and generally the most secure. They require drilling holes in your truck bed or a bed liner to bolt the mount directly down. This provides the most stable and permanent solution.
- Clampon/Clamp-Style Mounts: These mounts are designed to attach to your truck bed’s existing rails or edges without drilling. They use clamps to grip the bed rail, making them a great option for those who don’t want to modify their truck bed or for leasing situations.
- Removable/Portable Mounts: Some fork mounts are designed to be easily removed when not in use. This can be useful if you frequently need to use your entire truck bed for other purposes. They often have a base that can be secured with brackets or even a weighted system for temporary use.
- Fork Mounts Integrated into Bike Racks: Many truck bed bike racks come with built-in fork mounts. These are often designed for a specific truck model and provide a comprehensive solution for carrying multiple bikes.
The best type for you will depend on your truck, your willingness to make modifications, and how often you plan to use the mounts.
Choosing the Right Fork Mount for Your Truck
Selecting the perfect fork mount involves a few key considerations. Don’t just grab the first one you see! A little thought upfront will save you headaches down the road.
Compatibility Checks
Before you buy, do your homework:
- Truck Bed Type: Does your truck have a plastic bed liner? Are the sides flat? Does it have factory-installed bed rails? This will dictate whether you need a drill-mount or a clamp-on style.
- Fork Type: Most modern bikes use either a quick-release (QR) skewer or a thru-axle. QR skewers are typically 9mm, while thru-axles can range from 12mm to 20mm in diameter. Ensure the mount you choose is compatible with your bike’s fork. Many mounts come with adapters or offer different versions for various axle sizes. Check out resources like Park Tool’s axle standard overview to understand your bike’s setup.
- Number of Bikes: How many bikes do you typically haul? You can buy individual mounts and space them out, or opt for a multi-bike rack system that features multiple fork mounts.
Material and Durability
Fork mounts are exposed to the elements, so material matters:
- Aluminum: Lightweight and rust-resistant. A good choice for most applications.
- Steel: Stronger and often more affordable, but can be heavier and prone to rust if not coated properly.
- Plastic: Less common for the primary mounting components of heavy-duty mounts, but some parts might be made of durable, UV-resistant polymers.
Look for sturdy construction and corrosion-resistant finishes, especially if you live in an area with high humidity or frequent rain.
Installation Considerations
Think about how you plan to install the mount:
- Drilling Required (Direct Mount): This offers the most secure installation but permanently alters your truck bed. If you have a plastic bed liner, drilling through it is often easier. For metal beds, you’ll need appropriate drill bits and potentially sealant to prevent rust.
- No Drilling Required (Clamp-On): Ideal for leased vehicles or if you prefer not to modify your truck. Ensure the clamps are robust and designed to grip your specific truck bed rails firmly.
- Temporary or Removable Mounts: These are convenient but might require extra steps to secure properly, especially for longer trips or rougher terrain.
Table: Fork Mount Features to Compare
Here’s a quick rundown of features to weigh:
| Feature | Importance | Considerations |
|---|---|---|
| Mounting Type | High | Drill-on vs. Clamp-on. Permanent vs. Removable. |
| Axle Compatibility | Critical | Quick-release (QR) vs. Thru-axle (measure diameter!). |
| Material | Medium-High | Aluminum (light, rust-resistant) vs. Steel (strong, heavier). |
| Locking Mechanism | High | Secure and easy to operate. |
| Number of Bikes | Medium | Single mount vs. multi-bike rack. |
| Weight Capacity | Medium | Ensure it can handle your bike’s weight and potentially more. |
By comparing these features, you can narrow down your options and find a fork mount that perfectly suits your needs and your truck.
Installation Guide: Getting Your Fork Mount Set Up
Don’t be intimidated by installation! Most fork mounts are pretty straightforward. We’ll cover the most common methods. Always refer to your specific mount’s instructions, as they can vary.
Method 1: Direct Bolt-On Installation (Requires Drilling)
This is the most secure method, especially for permanent solutions.
Tools You’ll Likely Need:
- Your fork mount kit
- Drill and appropriate drill bits (sized for your mounting bolts)
- Wrench or socket set
- Measuring tape
- Pencil or marker
- Level (optional, but helpful)
- Safety glasses
- Gloves
- Optional: Sealant (e.g., silicone or automotive RTV) for sealing drilled holes.
Step-by-Step:
- Determine Placement: Decide where you want your bikes positioned in the truck bed. Consider how much space you need for other gear and ensure the bikes won’t interfere with your truck’s tailgate when it’s down. Measure carefully to ensure you have enough clearance between mounts for handlebars.
- Mark Drilling Locations: Place the fork mount base plate in your desired position. Use a level if you want it perfectly straight. Mark the hole locations on your truck bed liner or metal bed with your pencil/marker.
- Drill the Holes: Put on your safety glasses and gloves. Carefully drill pilot holes at your marked locations. Start with a smaller bit and then use the size recommended by your mount’s instructions. If drilling into metal, consider applying a rust-inhibiting sealant to the edges of the holes after drilling.
- Attach the Mount: Position the fork mount base plate over the drilled holes, aligning them. Insert the provided bolts from the top down through the mount and the truck bed.
- Secure the Mount: From underneath (if accessible) or through the pre-existing holes in the bed, attach the washers and nuts. Tighten securely with your wrench or socket set. Don’t overtighten to the point of stripping threads, but make sure it’s snug and doesn’t wiggle.
- Repeat for Additional Mounts: If you have multiple mounts, repeat the process, ensuring they are spaced correctly for your bikes’ handlebars.
Method 2: Clamp-On Installation (No Drilling)
Perfect for those who want to avoid drilling or need flexibility.
Tools You’ll Likely Need:
- Your fork mount kit
- Wrench or socket set
- Measuring tape
- Safety glasses (recommended)
Step-by-Step:
- Identify Clamp Points: Determine where your truck’s bed rail or edge is designed to accept clamps. Most clamp-on mounts attach to the top edges of the bed.
- Position the Mount: Place the fork mount base over the bed rail. Slide the clamps into position under the rail or along the edge, as per your mount’s design.
- Align and Secure: Ensure the fork mount is positioned correctly and is stable on the rail. You might need to adjust the clamp positions to get a snug fit.
- Tighten the Clamps: Use your wrench or socket set to tighten the bolts on the clamps. The clamps will grip the bed rail, securing the mount. Tighten them evenly and firmly. Make sure the mount doesn’t rock or shift.
- Repeat for Additional Mounts: Position and clamp any other mounts, ensuring proper spacing for handlebars.
Final Checks for Both Methods
Once installed, give each mount a good shake and pull. They should feel solid and completely secure. This is your first line of vehicle-bike defense!
Loading and Securing Your Bike
With your fork mounts in place, it’s time to load your bike. This is where the magic happens!
Step-by-Step Loading:
- Remove Front Wheel: If your bike isn’t already, shift to a smaller chainring in the front. Release your front brake (if it’s a rim brake) and undo your quick-release skewer or thru-axle. Pull the wheel out.
- Position Bike: Lift your bike and place the fork ends into the fork mount cradle on your truck bed.
- Secure the Fork: Clamp the fork into the mount. If it’s a QR style, ensure the skewer clicks shut securely. For thru-axles, tighten the bolt or mechanism as per the mount and your bike manufacturer’s recommendations. It needs to be snug but not so tight that you damage the fork lowers.
- Stability Check: Gently lean the bike forward and back. It should feel stable. If it wiggles excessively, re-check your fork clamp.
- Handlebar Management: If you have multiple bikes side-by-side, the handlebars might touch. You can use fabric ties or Velcro straps to gently secure them together to prevent scratching. Some riders also use handlebar guards.
- Rear Wheel Tie-Down (Optional but Recommended): While the fork is locked, the rear wheel can still move slightly. Use a simple strap (like a cam strap or bungee cord, though straps are more secure) to tether the rear wheel to a tie-down point in the truck bed. This prevents the back end from swinging.
Important Loading Tips:
- Always Double-Check: Before hitting the road, give your bikes a thorough wiggle test. Ensure everything is tight and secure.
- Avoid Overcrowding: Don’t try to stuff too many bikes into the available space. Allow adequate room for handlebars and pedals to prevent damage.
- Consider Front Wheel Storage: You’ll need a place to store your front wheels. Some truck bed organizers have dedicated compartments, or you can simply lay them flat in a corner of the bed, perhaps in a cloth bag to keep them clean.
- Check Your Bike’s Axle Specs: If you have a modern mountain bike with a thru-axle, make sure you know the exact diameter and standard (e.g., Boost, non-Boost) for your front fork to buy the correct mount or adapter. Resources like Pinkbike’s explanation of Boost spacing can be super helpful here.
Taking a few extra moments to secure everything properly will save you a lot of potential trouble and keep your bikes in pristine condition.
Maintaining Your Fork Mounts
Like any gear, a little care goes a long way in keeping your fork mounts functional and safe for years to come.
Simple Maintenance Steps:
- Clean Regularly: After dusty rides or trips in muddy conditions, wipe down your mounts. Use a damp cloth to remove dirt and grime. If you’ve been in salty environments (like near the coast), rinse them with fresh water.
- Inspect for Wear and Tear: Periodically check the mounting hardware (bolts, nuts, clamps) for any signs of rust, looseness, or damage. Ensure the fork clamping mechanism operates smoothly.
- Lubricate Moving Parts: If the clamp or lever feels stiff, apply a small amount of lubricant (like a silicone spray or bicycle chain lube) to the moving parts. Don’t overdo it; you don’t want greasy mounts that attract dirt.
- Check Mounting Security: