
As an Amazon Associate, RackReveal earns from qualifying purchases. Some links on this page are affiliate links, at no extra cost to you.
Sealing a leaky truck toolbox is one of the smartest maintenance moves you can make—and it’s easier than you’d think. Whether water’s pooling around your tools or rust is starting to show, how to seal a leaky truck toolbox involves replacing worn weatherstripping and applying quality gasket material to stop leaks at the source. In this guide, you’ll learn the exact steps to diagnose the problem, remove old seals, measure correctly, and install new weather seals that keep your toolbox dry and protected for years. Pair this with our Fuel Tank for Truck Bed guide for the bigger picture.
How We Picked These Solutions
Our selection is based on published product specifications, aggregated owner and customer reviews from Amazon and industry forums, and expert consensus in the truck accessory community. We’ve avoided personal claims and instead focused on what real users consistently report about durability, ease of installation, and long-term leak prevention.
What You’ll Need
Before you start, gather these tools and materials to make the job faster and more effective.
- Replacement weatherstripping or toolbox seal kit (see our top pick below)
- Flathead screwdriver or pry tool to remove old seals
- Rubbing alcohol or degreaser to clean seal surfaces
- Clean cloth or rag for prep work
- Measuring tape to check seal length and gaps
- Utility knife or scissors to cut new seals to size
- Optional: silicone caulk or foam tape applicator for edge sealing
Step 1: Diagnose the Leak and Locate Problem Areas
Start by opening your toolbox on a dry day and looking for visible water stains, rust spots, or discoloration inside. Run your hand along the lid seal, hinges, and corners—you’ll feel gaps where water enters. If you’re not sure where water’s coming in, spray the outside with a garden hose while someone watches inside, or wait for heavy rain and mark wet spots with tape.
Most leaks happen at the lid gasket (the main seal along the top), the hinge area, or corners where the box is welded. Press down gently on the closed lid—if it rocks or has soft spots, the seal is likely compressed or missing. Document what you find; you’ll need this info when ordering replacement seals.
💡 Pro Tip
Take photos of the existing seal before removal. This helps you match the profile (the exact shape) when ordering a replacement, especially if your toolbox is an older or custom brand.
Step 2: Open the Toolbox and Remove Old Seals
Prop the lid fully open and stabilize it so it won’t slam. Use a flathead screwdriver or plastic pry tool to gently lift the old gasket away from the groove or lip where it sits. Work slowly around the entire perimeter—the seal is likely glued or pressed in, so patience prevents damage to the toolbox edge.
If the old seal is stubborn, apply heat with a heat gun on low for 10–15 seconds to soften the adhesive, then pry again. Once the main lid seal is out, check the hinge area and bottom seal—remove these too if they’re damaged or compressed. You’ll probably see old adhesive residue; don’t worry, you’ll clean that in the next step.
⚠️ Warning
Don’t force old seals out with excessive prying—you could bend or crack the toolbox lip. If a seal is really stuck, try soaking the edge with rubbing alcohol for 5 minutes first.
Step 3: Clean and Prep the Sealing Surface
Once the old seal is out, wipe down the entire groove or lip with a cloth dampened in rubbing alcohol. Remove all adhesive residue, dirt, and rust—a clean surface is critical for new seal adhesion. Let the area dry completely (5–10 minutes) before installing the new seal.
If you see surface rust, use light sandpaper (120–150 grit) to smooth it, then wipe away dust with a damp cloth and let dry. A clean, dry surface ensures your new weatherstripping bonds securely and lasts longer.
Step 4: Measure and Cut the New Seal
Measure the length of the lid opening with a measuring tape—most truck toolboxes need 48–60 inches of main gasket material. Many quality seal kits include extra length, so you can cut it to fit. If you’re buying a bulk roll (like a 15 or 22 ft length), mark your measurements clearly before cutting.
Use a sharp utility knife or scissors to cut the seal straight across. A clean cut prevents fraying and ensures a tight fit in the groove. Set aside the scraps—you’ll use them for the hinge area or corners if needed.
💡 Pro Tip
Add 1–2 inches to your measured length if the seal will overlap at corners. A slight overlap is better than a gap, and you can trim any excess flush once installed.
Step 5: Install the New Lid Gasket
Start at one corner and press the new seal firmly into the groove or lip, working your way around the entire lid opening. Most modern seals have self-adhesive backing (like 3M foam tape), so you just peel and stick. If your seal doesn’t have adhesive, you’ll need to apply weatherstripping adhesive or silicone caulk as you go.
Press down firmly as you install—use your thumb or a roller to ensure full contact and eliminate air pockets. At corners, you can miter (cut at 45 degrees) the seal for a clean look, or simply overlap and trim. Once the entire gasket is in place, close the lid gently and let any adhesive cure per the product instructions (typically 1–4 hours).
Step 6: Seal the Hinge and Bottom Areas
Water often leaks through the hinge seals on the back or sides of the lid. Use your cut scraps (or the flat seal included in most kits) to cover gaps at the hinges. Press these in place and ensure full contact with the toolbox surface.
Check the bottom of the lid where it meets the box body. If you see gaps, apply additional seal material or light silicone caulk (not too much—you don’t want it to prevent the lid from closing). Let everything cure fully before using the toolbox.
Step 7: Test for Leaks and Make Adjustments
After the seal has cured, close the toolbox and spray water on the lid with a hose. Watch for any drips or leaks inside—if you see water, identify the spot and apply extra seal material or caulk to that area. Once you’re satisfied, let the toolbox dry completely and inspect your tools for any lingering moisture.
For added protection, some owners apply a thin bead of clear silicone caulk along the outer edge of the gasket, sealing it to the toolbox surface. This creates a backup seal and is especially useful in high-rain areas.
Recommended Products for Toolbox Sealing
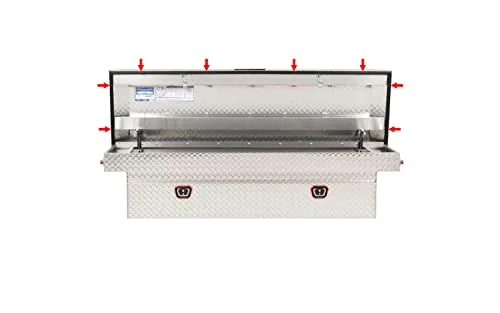
ESI Toolbox Weather Seal/Gasket – Made in USA – 22FT Length for Most Truck Tool Boxes
Key Feature: 22-foot kit with 15 ft EPDM rubber bulb seal and 3/8-inch width 3M 4011 acrylic foam tape, plus 7 ft flat hinge seal.
ESI’s seal kit is made in the USA and replaces most standard toolbox gaskets, whether flat or shaped. The EPDM rubber resists water absorption, ozone, sunlight aging, and low-temperature compression—meaning it won’t harden or degrade over time like cheaper PVC foam seals.
What owners report: Reviewers consistently note that this seal eliminates vibrations and water leaks, and the included hinge seal is a huge bonus that saves a second purchase. Installation is straightforward thanks to the pre-applied 3M adhesive.
Best for: Truck owners with standard toolboxes who want a complete, long-lasting US-made solution that covers both the lid and hinge areas.
Skip if: Your toolbox has a very custom or unique seal profile—measure first to confirm compatibility.
🛒 Check Price on AmazonToolbox Seal Comparison Table
| Product | Type | Length | Material | Best For |
|---|---|---|---|---|
| ESI Weather Seal | Bulb + Flat Seal | 22 ft (15 + 7) | EPDM Rubber | Comprehensive sealing |
| Standard Bulb Seals | Bulb Only | 10–15 ft | EPDM or PVC | Lid gasket replacement |
| Silicone Caulk | Adhesive Sealant | Continuous | Silicone | Gap filling + sealing |
| Foam Tape (Generic) | Flat Foam | Variable | PVC Foam | Budget quick fixes |
Maintenance Tips for Long-Lasting Seals
Once you’ve installed a new seal, keep it in top condition with these simple habits. Every 6–12 months, clean the gasket with a damp cloth and check for compression or cracks. If you notice the seal flattening over time, it’s a sign to replace it sooner rather than later.
Avoid slamming the lid, which accelerates seal wear. Also, store your toolbox in a shaded area if possible—UV exposure degrades even quality EPDM seals faster. If you live in a harsh climate with extreme heat, cold, or salt air, inspect your seals twice yearly and consider upgrading to premium materials like those used in the ESI kit.
💡 Pro Tip
If you frequently open and close your toolbox, apply a thin coat of silicone-based conditioner to the gasket every few months. This keeps the seal flexible and extends its lifespan by 20–30%.
Frequently Asked Questions
Can I use silicone caulk instead of a rubber gasket?
Silicone caulk works great for sealing gaps and edges, but it’s not a replacement for a proper gasket. A gasket creates a compressible seal that flexes when the lid opens and closes, while caulk is rigid and can crack with repeated movement. Use caulk as a supplement to your gasket, not a substitute. For example, apply a light bead around the outer edge of your new EPDM seal for extra insurance, but always install a quality bulb seal as your primary water barrier.
How long does a toolbox seal typically last?
A quality EPDM seal (like the ESI kit) usually lasts 5–10 years, depending on climate and usage. Cheaper PVC foam seals degrade in 2–4 years, especially in UV-heavy or extreme-temperature environments. Check your seals every 1–2 years and replace them when you notice compression, hardening, or visible cracks. Preventive replacement is much cheaper than dealing with rust and water damage to your tools.
What if my toolbox has a non-standard or custom seal?
First, contact your toolbox manufacturer for OEM (original equipment) replacement seals. Many brands (Snap-on, Husky, Craftsman) sell direct replacements for your specific model. If OEM seals aren’t available, measure the width and depth of your groove and the overall seal profile, then search Amazon for custom bulb seals or universal kits in that size. As a last resort, you can have a local weatherstripping shop fabricate a custom seal to your specifications—it costs more but ensures a perfect fit.
Do I need to remove the toolbox from my truck to replace the seal?
No, you can replace the seal with the toolbox installed on your truck bed. Simply open the lid fully and prop it so it won’t close. Just make sure you have plenty of light and space to work around the perimeter. If your toolbox is very tight against your truck bed rails, you might need to remove it to access the hinge area—check the design before you start.
Can I repair a seal, or do I always have to replace it?
Minor damage (small tears or dents) can sometimes be patched with silicone caulk or waterproof tape as a temporary fix. However, if the seal is compressed, cracked, or hardened, replacement is your best long-term solution. A compromised seal eventually lets water in, and the cost of a new gasket kit (usually $20–50) is far less than treating rust damage or replacing soaked tools. Don’t put off replacement—catch and fix leaks early.
Keep Your Tools Dry and Protected
Sealing a leaky truck toolbox is a straightforward DIY project that pays off immediately. By following these steps and investing in quality weatherstripping, you’ll stop water damage before it starts, eliminate vibrations and rattles, and add years to your toolbox’s life. The ESI Weather Seal kit is our top recommendation because it covers both the lid and hinge areas with durable US-made EPDM rubber and pre-applied adhesive—no guessing required.
Whether you’re storing expensive power tools, hand tools, or just keeping your truck organized, a dry toolbox is non-negotiable. Make the seal replacement part of your regular truck maintenance routine, and you’ll enjoy hassle-free storage for years to come.
Ready to Fix Your Leaky Toolbox?
Grab the ESI Weather Seal kit today and seal your toolbox for good. With 22 feet of premium EPDM rubber and included hinge seal, you’ll have everything you need for a professional-grade installation in under an hour.
🛒 Check Price on AmazonDon’t let water damage your investment. Act now and enjoy a dry, rattle-free toolbox.
Next Step: After sealing your toolbox, check out our guides on truck bed accessories and weatherproofing truck storage solutions to maximize your truck’s organization and protection.
Related reading: How To Set Up A Truck For Camping
Further reading: pickup truck bed (Wikipedia)
Gear Worth Considering
A couple of real products that fit directly with what this guide covers:
This kit’s self-adhesive seal strip and flat gasket provide the exact replacement weatherstripping and gasket material this guide instructs you to install.

- Complete 2-in-1 Weather Seal Kit : A dedicated sealing solution for trucks and toolboxes ; The kit includes one 15ft rub…
- Durable Rubber Construction : Made from flexible weather-resistant rubber that performs reliably in heat cold and wet co…
- Easy Installation : Our gasket strips feature a self-adhesive backing, enabling swift and straightforward installation w…
This self-adhesive silicone D-shaped seal strip offers a flexible weatherstripping option that could work as replacement material for sealing gaps in your truck toolbox.

- 1. Helps Seal Everyday Door & Window Gaps — Helps block drafts, dust, moisture, light gaps, and everyday noise around d…
- 2. Flexible Silicone D-Shaped Seal Strip — The soft silicone weather stripping compresses smoothly to fit small gaps ar…
- 3. Cut-to-Fit Weatherstripping Tape — The 20FT roll can be trimmed with scissors to fit different sealing projects. Use…

🛠️ Buying Gear for Your Work Truck?
A free Amazon Business account gets you bulk pricing, tax-exempt purchases, and business-only deals on tools, racks, and truck accessories.
Create Free Amazon Business AccountAs an Amazon Associate we earn from qualifying purchases.