
Quick Summary: To make roof racks quieter, address wind noise by installing wind fairings, checking for loose parts, using aerodynamic accessories, and adding foam or rubber dampers. Proper installation and regular maintenance are key to a peaceful drive.
That familiar whistling or roaring sound from your roof rack when you’re driving can be quite a distraction. It’s a common issue for many car owners who rely on roof racks for adventure gear, work equipment, or extra luggage. But don’t worry, you don’t have to live with the constant noise! This guide will walk you through simple, effective ways to silence that annoying wind noise and enjoy a much quieter, more pleasant ride.
We’ll cover everything from basic checks and simple fixes to more advanced solutions. By the end of this article, you’ll have the know-how to tackle roof rack noise head-on, making your journeys more enjoyable and less stressful.
Common Causes of Roof Rack Noise
Before we dive into the solutions, it’s helpful to understand why roof racks make noise in the first place. The primary culprit is usually wind interaction. When air flows over and around your roof rack, it can create turbulent eddies that generate sound waves. This noise can manifest as whistling, humming, buffeting, or a general roaring sound.
Several factors contribute to this:
- Rack Design: Some rack designs are inherently more aerodynamic than others. Square or U-shaped bars tend to create more turbulence than sleek, airfoil-shaped bars.
- Installation: Improperly tightened clamps, misaligned bars, or a rack that isn’t flush with your vehicle’s roof can create gaps where wind can enter and cause noise.
- Speed: Wind noise typically becomes more noticeable at higher speeds as the volume and force of air hitting the rack increase.
- Wind Direction and Strength: Crosswinds or strong headwinds can exaggerate the noise your roof rack produces.
- Accessories: Adding bikes, kayaks, cargo boxes, or even just the empty mounts for these can alter the airflow and introduce new sources of noise.
- Wear and Tear: Over time, rubber seals can degrade, or mounts can loosen, contributing to noise.
Proven Solutions to Quiet Your Roof Rack
Now for the good news! There are several practical and proven methods you can use to significantly reduce or eliminate roof rack noise. Let’s break them down:
1. Install a Wind Fairing
This is hands-down one of the most effective ways to combat wind noise. A wind fairing, also known as a wind deflector, is a panel that attaches to the front of your roof rack system. Its primary purpose is to redirect airflow smoothly over your rack and the rest of your vehicle’s roof.
How it works: The fairing breaks up the direct onslaught of wind, preventing it from hitting the crossbars at harsh angles and creating turbulence. Think of it like the spoiler on the front of a sports car – it guides the air. Fenders are typically made of durable plastic and come in various widths to match different rack systems.
Installation: Most fairings are designed for relatively easy DIY installation. They usually clamp onto the front crossbar and sometimes have additional straps or clips for stability. Always follow the manufacturer’s instructions carefully.
Benefits:
- Significantly reduces whistling and buffeting sounds.
- Improves aerodynamics, potentially leading to slight fuel efficiency gains.
- Can also protect your roof from minor scratches from luggage or accessories.
Considerations:
- Ensure you select a fairing that fits your specific crossbar shape and size.
- Some larger fairings might require occasional re-tightening.
2. Tighten and Inspect for Loose Parts
A surprisingly common cause of noise is simply a part that’s not as secure as it should be. Vibration from driving can loosen clamps, brackets, and even the bars themselves over time.
What to check:
- Clamps and Feet: Ensure all clamps that attach the rack to your vehicle’s roof rails or door frames are snugly tightened. Use the provided tool or a standard wrench if applicable.
- Crossbar Connections: If your crossbars detach or adjust, make sure they are securely locked in place.
- Accessory Mounts: Any added mounts for bikes, kayaks, or cargo boxes should also be checked for tightness.
- Rubber Strips/Seals: Many racks have rubber inserts or padding to reduce vibration and noise. Check that these are in place and not torn or missing.
How to do it: Park your vehicle on a level surface. Systematically go through each connection point on your roof rack. Gently try to wiggle each part to detect looseness. Tighten anything that feels even slightly unsteady. It’s a good practice to do this periodically, perhaps every few months or before a long trip.
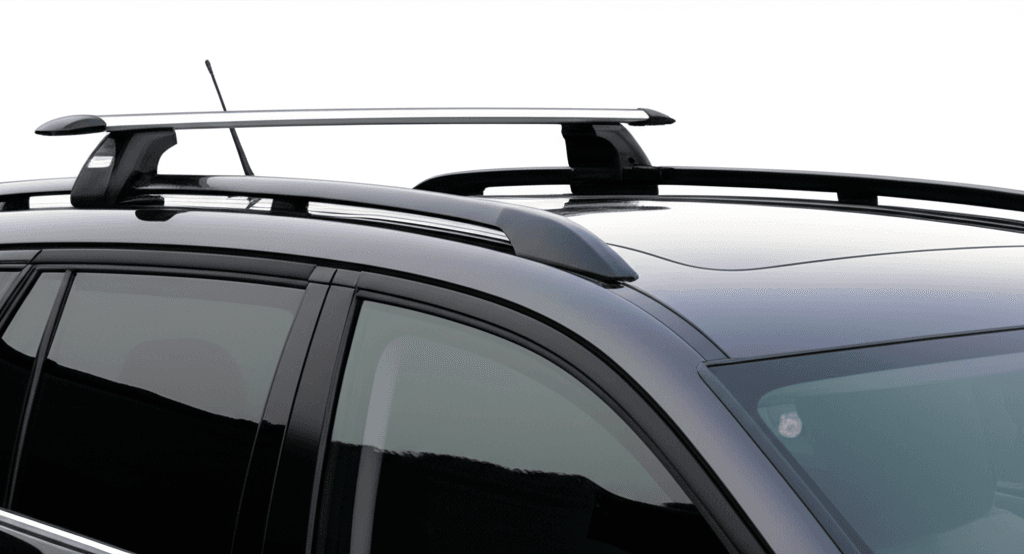
3. Use Aerodynamic Crossbars
The shape of your crossbars plays a huge role in how quietly they operate. Older or more basic roof rack systems often use square or round bars, which aren’t the most aerodynamic.
What are aerodynamic crossbars? These are typically flat, airfoil-shaped bars, often made of aluminum. They are designed to mimic the shape of an airplane wing. This shape allows air to flow over them much more smoothly, significantly reducing the turbulence that causes noise.
Benefits:
- Dramatically quieter operation compared to round or square bars.
- Often stronger and more durable.
- Can have integrated T-slots for easier mounting of accessories, eliminating the need for some extra clamps that can also create noise.
Considerations:
- They can be more expensive than basic bar types.
- Ensure your existing accessories are compatible with the T-slot system or can be adapted.
If you find yourself frequently using your roof rack and the noise is a persistent annoyance, investing in aerodynamic crossbars can be a game-changer. Many reputable brands like Thule, Yakima, and Rhino-Rack offer these types of bars.
4. Add Foam or Rubber Dampers
Even with well-designed bars, some vibration and noise can occur. Adding simple foam or rubber dampers can help absorb these vibrations before they turn into audible noise.
Types of Dampers:
- Foam Padding: High-density foam pipe insulation (like that used for plumbing) can be cut to size and wrapped around crossbars. This is a very budget-friendly DIY solution.
- Rubber Strips/Tape: Specialized rubber strips designed for roof racks can be adhered to the top or bottom surfaces of your crossbars to help dampen noise. You can also use sturdy, weather-resistant rubber tape.
- Anti-Vibration Washers/Pads: When installing accessories, consider using rubber washers or small anti-vibration pads between metal components to prevent metal-on-metal contact, which can create buzzing or rattling.
How to apply foam pipe insulation:
- Measure the circumference of your crossbar.
- Purchase foam pipe insulation that is slightly larger than this measurement.
- Cut the insulation to the length of your crossbar or the sections that seem to generate the most noise.
- Slit the insulation lengthwise and fit it around the crossbar. You can secure it with zip ties or strong adhesive tape if needed.
- Repeat for all crossbars, especially the front one.
Benefits:
- Inexpensive and easy to implement.
- Can target specific areas where noise is most prominent.
- Provides a cushioning effect.
Considerations:
- DIY foam solutions might not be the most aesthetically pleasing.
- Ensure the material used is weather-resistant and won’t degrade quickly in the sun or rain.
5. Secure Accessories Properly
The items you carry on your roof rack can also be a source of noise. If bikes, kayaks, or cargo boxes aren’t securely fastened, they can vibrate and create rattling or flapping sounds.
For Bike Racks:
- Ensure bike frames are firmly clamped.
- Check that any straps holding wheels are tight.
- If you have multiple bikes, position them so they don’t bang against each other.
For Kayak/Canoe Racks:
- Tighten the straps that secure your watercraft.
- Ensure the kayak or canoe is centered and balanced.
- If using J-cradles or similar carriers, make sure the watercraft is seated correctly and all straps are snug.
For Cargo Boxes:
- Close and lock the cargo box securely.
- Ensure the internal latches or tie-down points are engaged if your box has them.
- Double-check that the box is firmly attached to the crossbars.
For Cargo Bags/Nets:
- If using a soft cargo bag or net, ensure it’s packed tightly and strapped down securely to prevent flapping. An under-filled bag can be especially prone to wind noise.
General Tip: Before setting off on a journey with new or re-packed gear, do a quick test drive around your neighborhood. Listen for any unusual noises and re-tighten as needed.
6. Consider Aerodynamic Accessories (Cargo Boxes, etc.)
Some aftermarket accessories are designed with aerodynamics in mind, which can help keep noise down. When choosing cargo solutions, opt for those with smoother lines and designs that integrate well with your vehicle and rack system.
Cargo Boxes: Modern cargo boxes are often designed with rounded edges and a sleeker profile than older models. Some have a “low profile” design that sits closer to the roof rails, further reducing wind resistance and noise.
Kayak/Bike Mounts: Look for carriers that hold gear as close to the crossbars as possible. Carriers that extend significantly upwards or outwards can catch more wind. Some designs also feature integrated wind-reducing elements.
Integrated Systems: Many higher-end roof rack systems are designed to work together seamlessly. For example, crossbars, fairings, and specific accessory mounts are engineered to complement each other aerodynamically, minimizing noise.
7. Reduce Unused Parts
If you have a roof rack system with many components that aren’t currently in use, they can sometimes contribute to noise. For example, if your rack has removable towers or specific accessory mounts you’re not using, consider removing them when not needed.
How to approach:
- Removable Towers: If your rack base system allows for easy removal of towers, consider taking them off between trips.
- Unused Mounts: If you have specific mounts for a bike or kayak that aren’t currently fitted, and they create drag when exposed, consider removing them.
- Crossbar Spacing: While not always adjustable without effort, sometimes adjusting the spacing between crossbars can slightly alter the airflow and noise profile. Refer to your rack’s manual for recommendations or guidelines.
Benefit: This is a simple way to streamline your setup, potentially reducing wind resistance and noise. It also reduces the weight on your roof.
8. Use Wind Noise-Reducing Tape or Strips
Similar to adding foam or rubber dampers, specialized tape or strips can be applied to the leading edges of your crossbars or other surfaces where wind might catch. These products are often made of durable, flexible materials.
How it works: These tapes are designed to smooth out the airflow by creating a less abrupt transition for the wind. Think of how aircraft wings are designed with smooth, rounded leading edges.
Where to apply:
- The front leading edge of your crossbars.
- Edges of fairings that might be catching wind.
- Any other point on the rack system that seems to be a source of noise.
Considerations:
- Ensure you use a high-quality, automotive-grade tape that can withstand weather conditions and UV exposure.
- Clean the surface thoroughly before application to ensure good adhesion.
- Some tapes are visible, so consider the aesthetic impact.
For more information on aerodynamic principles that apply to vehicle design and accessories, resources like NASA’s educational materials provide insights into how shapes affect airflow, which can be indirectly applied to understanding roof rack noise.
9. Drive Smarter
Sometimes, the simplest solution involves adjusting your driving habits, especially at higher speeds.
Speed: Wind noise is directly proportional to speed. Driving a few miles per hour slower can significantly reduce the noise. If the noise is particularly bothersome on the highway, consciously reducing your speed if safe to do so can make a difference.
Windows: Close all windows and sunroofs, of course. Sometimes, even a slightly open window can create a harmonic pitch with the roof rack noise, making it seem louder.
Gear Loading: Ensure gear is loaded evenly and securely. An unbalanced load can cause the rack itself to vibrate more, leading to noise.
Maintenance Tips for a Quieter Rack
Regular maintenance is key to keeping your roof rack in good working order and, importantly, quiet.
After Installation: After initial installation, check all connections again after about 50-100 miles (80-160 km). Vibrations can cause things to settle and loosen slightly.
Periodic Checks: Schedule regular checks (e.g., every 3 months or before major trips) to ensure all bolts, clamps, and locks are tight. Pay attention to rubber components for any signs of wear or cracking.
Cleaning: Clean your roof rack periodically with mild soap and water. This removes dirt and grime that could potentially interfere with seals or cause friction. Ensure it’s dry before re-installing any removable parts.
Winter Care: If you live in an area with snow and ice, be sure to clear your rack of snow and ice. The weight and texture of accumulated ice can increase noise.
Choosing the Right Roof Rack for Quiet Operation
If you’re in the market for a new roof rack, choosing one with quiet operation in mind from the start can save you a lot of hassle. Here’s what to look for:
| Feature | Impact on Noise | What to Look For |
|---|---|---|
| Bar Shape | High impact | Aerodynamic/Airfoil shape is quietest. Avoid square/round bars if noise is a priority. |
| Mounting System | Medium impact | Systems that clamp securely and fit flush with the vehicle’s roof are generally quieter. Integrated systems that blend with the car’s design are often best. |
| Material | Low impact | While all materials can make noise, aluminum bars common in aerodynamic designs tend to be very strong and stable. |
| Accessory Compatibility | Medium impact | Racks with T-slots allow for sleek accessory mounting that often eliminates external clamps, reducing noise potential. |
| Brand Reputation | Indirect impact | Reputable brands often invest more in R&D for quieter, more aerodynamic designs. Read reviews! |
| Integrated Fairing | High impact | Some premium racks come with a built-in fairing or a design that allows for one with minimal fuss. |
When researching, look for terms like “quiet,” “aerodynamic,” or “low-profile.” Online reviews and forums are excellent resources for