
As an Amazon Associate, RackReveal earns from qualifying purchases. Some links on this page are affiliate links, at no extra cost to you.
Installing running boards on your truck doesn’t require a trip to the dealership or professional mechanic—you can do it yourself in just a few hours. Running boards (also called side steps or nerf bars) provide a safer, more convenient way to climb into your truck bed and protect your vehicle’s lower sides from road debris. In this guide, you’ll learn how to install running boards on a truck using basic tools and straightforward techniques that work across most truck models and brands. For a closer look at running boards f250, see our Best Running Boards For F250 2026 guide.
How We Picked These Products
Our product recommendations are based on published manufacturer specifications, aggregated owner reviews across multiple platforms, and expert consensus from truck accessory forums. We evaluated durability ratings, installation difficulty, fitment accuracy, and real-world feedback from truck owners who’ve installed these boards on their vehicles.
What You’ll Need: Tools & Equipment
Before you start, gather these essential tools and safety equipment. Most of these are probably already in your garage, but a few specialized items will make the job much easier and safer.
- Socket wrench set (metric and standard sizes, typically 10mm–17mm)
- Adjustable wrench for various bolt sizes
- Torque wrench to ensure bolts are tightened to manufacturer specifications
- Jack and jack stands to safely lift your truck
- Rubber mallet to gently align brackets
- Safety glasses and work gloves
- Flashlight or headlamp for seeing underneath the truck
- Level to ensure running boards are properly aligned
Recommended Running Boards to Install
If you don’t already own running boards, here’s a top-rated option that makes installation straightforward:
COMNOVA 6 Inches Running Boards & Steps for 2019–2026 Chevy Silverado 1500 & 2500HD/3500HD Crew Cab
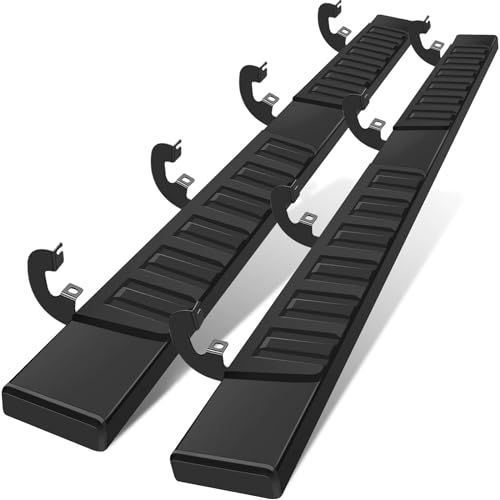
Heavy-duty carbon steel construction with anti-slip plastic steps supports up to 500 lbs per side and features a patent-pending adjustable slider design for perfect positioning.
Key Features:
- Fits 2019–2026 Chevy Silverado 1500 Crew Cab and 2020–2026 Silverado/Sierra 2500HD/3500HD Crew Cab (4-door models only)
- Direct bolt-on installation—no drilling required
- Adjustable forward and backward positioning for custom fit
- Powder-coated carbon steel with glitter finish for rust resistance
- Four brackets per side for secure mounting
Pros:
- No welding or drilling—fastest installation method
- Owners consistently report easy access to truck bed without stepping on bumper
- Adjustable design accommodates custom truck heights and suspension lifts
- Excellent ground clearance for off-road use
Cons:
- Fitment limited to specific crew cab models (won’t fit 2019 LD/Limited or single/double cabs)
- Step width (6 inches) is narrower than some premium competitors
- Some owners report needing to touch up powder coat after 2–3 seasons
Best for: Silverado and Sierra crew cab owners who want fast, tool-free installation with no permanent modifications.
Skip if: You own a single cab, double cab, or pre-2019 truck model.
💡 Pro Tip
If you’re unsure about fitment for your specific truck year and cab style, download the truck’s factory service manual from the manufacturer’s website. Running board brackets are designed around those exact frame dimensions, so knowing your truck’s year, make, model, and cab type is essential before purchasing.
Step-by-Step Installation Guide
Step 1: Prepare Your Workspace and Safety Equipment
Park your truck on a flat, level surface and engage the parking brake. If possible, use a concrete driveway or garage floor rather than grass or gravel, which can shift under the weight of the jack. Lay out all your tools and the running board kit so you have everything within arm’s reach—this prevents wasted trips and keeps your focus on the job.
Put on your safety glasses and work gloves before you begin. If you’re working in low light, set up your flashlight or headlamp now so you can see the underneath of the truck clearly. Have your friend or family member nearby if possible—they can help spot issues and ensure the running boards are level during installation.
Step 2: Safely Lift Your Truck with a Jack and Jack Stands
Before you start drilling or bolting anything, you’ll need access to the underside of your truck. Locate the frame jacking points—usually marked on the truck’s undercarriage or listed in your owner’s manual. Position your hydraulic jack under the frame jacking point on the driver’s side and raise the truck slowly and steadily until the tire just clears the ground.
Place a jack stand under the frame immediately after lifting. Never work under a truck supported only by a jack—hydraulic failures happen, and a falling truck is extremely dangerous. Repeat this process on the passenger side. Your truck should now be evenly elevated and fully supported by two jack stands, with the frame about 12–18 inches off the ground.
⚠️ Safety Warning
Never crawl under a truck supported only by a jack. Always use jack stands rated for your truck’s weight. A truck weighing 4,500–5,500 lbs requires jack stands rated for at least 5,000 lbs each. Check your stands’ weight capacity before use.
Step 3: Inspect the Frame and Clean Mounting Areas
Crawl underneath your truck and examine the frame and rocker panels where the running board brackets will attach. Look for rust, road salt buildup, or debris that could prevent proper fitting. Use a wire brush or cloth to clean these areas thoroughly—dirt and rust will compromise bracket alignment and bolt tightness over time.
Check the frame rails for any existing damage, cracks, or bends. If you spot serious corrosion or structural damage, consider consulting a mechanic before proceeding. Most modern trucks have solid frames under the rocker panels, so you’re likely clear to move forward.
Step 4: Dry-Fit the Running Board Brackets (No Bolts Yet)
Before you tighten a single bolt, position the running board brackets against the truck’s frame in their approximate final location. Most running boards come with four brackets per side—two mounting to the frame and two to the rocker panel or door sill area. Align the bracket holes with the frame mounting points and use your rubber mallet to gently tap brackets into position if needed.
Use your level to verify that each bracket sits flush against the frame. If brackets don’t align naturally, the frame might be bent or your truck might have an aftermarket suspension lift that shifts the frame height. Make fine adjustments now before drilling or bolting anything permanently.
Step 5: Mark Drill Points and Drill Pilot Holes (If Required)
Many modern running board kits use bolt-on installation with pre-drilled holes, meaning you won’t need to drill at all. However, if your kit requires drilling, carefully mark each hole location with a marker or center punch. Mark all holes for the driver’s side first, then move to the passenger side and repeat.
Using a drill bit slightly smaller than your mounting bolts (typically ¼ inch or 5/16 inch), carefully drill pilot holes through the marked points. Go slowly to prevent the drill bit from slipping—a slip can damage the truck’s frame or create misaligned holes. Once pilot holes are complete on both sides, move to the next step.
💡 Pro Tip
If you’ve never drilled through a truck frame before, start with one pilot hole and test-fit a bolt. This ensures your drill bit size is correct and the hole depth is right before you drill the remaining holes. It’s easier to drill additional holes than to fill and redrill a bad one.
Step 6: Insert Bolts and Hand-Tighten All Fasteners
Insert all bolts (usually grade 8.8 or stronger) through the brackets and into the frame holes. Use the washers and lock washers included in your running board kit—these prevent bolt loosening from vibration during normal driving. Hand-tighten each bolt snugly so the brackets are held in place but loose enough that you can still adjust bracket position if needed.
Start with all four bolts on the driver’s side, then all four on the passenger side. Don’t fully tighten anything yet. This “loose assembly” approach lets you verify everything aligns correctly before you commit to full torque.
Step 7: Check Alignment and Adjust Bracket Position
With all bolts hand-tight, use your level to verify that the running board steps are perfectly horizontal when viewed from the front and side of the truck. If the step tilts forward, backward, or side-to-side, the brackets need adjustment. Loosen individual bolts slightly and tap the bracket with your rubber mallet until the step is level, then re-tighten those bolts by hand.
Compare the driver’s side and passenger side running boards—they should be at identical heights and angles. If one side is higher or lower, loosen bolts and adjust until both sides match perfectly. This step is critical for a professional appearance and even wear on the anti-slip step surfaces.
Step 8: Torque All Bolts to Manufacturer Specifications
Once all brackets are aligned perfectly, it’s time to fully tighten every bolt using your torque wrench. Check your running board manual for the exact torque specification—most quality running board kits specify 40–60 ft-lbs (foot-pounds), though larger bolts might require up to 80 ft-lbs. Set your torque wrench to the manufacturer’s spec and tighten each bolt in a cross pattern (driver front, passenger rear, driver rear, passenger front) to ensure even pressure.
After reaching the correct torque on all bolts, do a final verification with your level. The running boards should still be perfectly horizontal. If anything has shifted, loosen the affected bolts, realign, and re-torque.
Step 9: Lower the Truck and Perform Final Safety Check
Carefully remove the jack stands from both sides of your truck. Using your hydraulic jack, slowly and evenly lower the truck back to the ground. Check that the truck sits level and that all four tires contact the ground properly. Once fully lowered, do a visual inspection of both running boards from all angles to confirm they’re straight and level.
Take a test drive at low speed (15–25 mph) through a parking lot to feel for any vibration or movement in the running boards. If you notice rattling or loose movement, return to the installation site, lift the truck, and re-torque any bolts that may have backed off due to settling.
💡 Pro Tip
Mark your calendar for a 100-mile and 500-mile bolt re-check. After new running boards experience road vibration and normal truck movements, some bolts may loosen slightly. A quick re-torque at these intervals prevents future rattling and extends the life of your installation.
Step 10: Protect and Maintain Your Running Boards
Once installed, your running boards are ready to use. To extend their lifespan, wash them monthly with soap and water, especially during winter months when road salt accumulates. If you notice any paint chips or areas where powder coating is worn, touch them up with matching spray paint to prevent rust formation.
Check the anti-slip plastic step surfaces periodically for debris buildup. Clean them with a stiff-bristled brush to maintain traction. Most quality running boards last 5–7 years with minimal maintenance, though harsh climates or extreme salt exposure may shorten that timeline.
Installation Troubleshooting Table
Running into issues during installation? Here’s a quick reference table for common problems and solutions:
| Problem | Likely Cause | Solution |
|---|---|---|
| Running boards sit at different heights on each side | Frame is bent, truck has a suspension lift, or bracket alignment is off | Lower truck, loosen all bolts, realign brackets with level, re-torque. If problem persists, truck may need professional frame alignment. |
| Bolts won’t fully tighten or keep backing out | Bolt holes are stripped, or lock washers are damaged | Replace bolts with one size larger, or install threaded inserts in stripped holes. Always use lock washers and new fasteners. |
| Running boards hit tire during suspension compression | Truck has aftermarket suspension lift or oversized tires | Check clearance with truck at ride height, fully loaded. May need relocation or aftermarket brackets designed for lifted trucks. |
| Rattling noise during normal driving | Bolts have loosened from vibration, or brackets are not fully seated | Re-torque all bolts to manufacturer spec. Verify brackets are flush against frame. Check for cracked welds on brackets. |
| Brackets don’t align with truck frame holes | Wrong running board model for your truck year/cab type | Double-check fitment specifications against your truck’s VIN. Purchase correct model or return running boards for refund. |
Additional Truck Accessory Resources
If you’re upgrading your truck’s exterior, you might also be interested in complementary accessories that enhance functionality and protection. Check out our guides on the best truck roof racks for cargo management and top-rated truck bed toolboxes for storage to complete your truck setup.
Frequently Asked Questions
Can I install running boards on any truck, or are they model-specific?
Running boards are typically model-specific due to differences in frame geometry, rocker panel height, and door sill alignment across truck manufacturers and generations. A running board kit designed for a 2023 Chevy Silverado won’t fit a 2023 Ford F-150 or a 2020 Silverado. Always verify your truck’s year, make, model, and cab type (crew, double, or single cab) before ordering. Most quality manufacturers publish fitment charts that show exactly which models each running board is designed for.
Do I need a professional mechanic to install running boards, or can I do it myself?
Most running board installations can be completed by DIY truck owners with basic mechanical skills and common tools. If your running boards use bolt-on brackets (no drilling required), installation typically takes 2–4 hours. However, if you’re uncomfortable working under a lifted truck or using a torque wrench, a professional installation at a truck accessory shop costs $150–$350 and ensures your safety. Always prioritize safety over saving a few dollars.
What’s the weight capacity for running boards, and is it safe to stand on them while accessing the truck bed?
Most quality running boards support 300–500 lbs per side when properly installed, making them safe for adults and most teenagers to stand on while accessing the truck bed. However, this assumes proper installation with fully torqued bolts and no structural damage to the truck frame. Never stand on running boards while the truck is moving, and don’t treat them as permanent steps for children or pets—they’re designed as entry aids, not climbing structures. Heavy loads over 500 lbs can cause bracket failure and unsafe conditions.
Will installing running boards affect my truck’s warranty?
In most cases, properly installed running boards don’t void your truck’s warranty because they don’t modify the engine, transmission, suspension, or other major systems. However, if the installation requires frame drilling or structural modifications, certain warranty components might be affected. Check your truck’s warranty documentation or contact your dealer before installation. Most manufacturers cover wear items separately from structural components, so running boards rarely trigger warranty exclusions when installed correctly.
How often should I re-tighten or maintain running board bolts after installation?
Re-check bolt torque at 100 miles and 500 miles after installation, then annually during regular truck maintenance. Road vibration can loosen fasteners in the first few hundred miles, so these early checks prevent rattling and bracket failure. After the initial 500-mile check, annual inspections during oil changes are sufficient for most owners. If you notice any rattling or movement during normal driving, immediately lift your truck and re-torque all bolts to manufacturer specifications.
Ready to Upgrade Your Truck?
Installing running boards transforms the way you access your truck bed and protects your vehicle’s lower sides from road damage. Whether you choose the COMNOVA running boards above or another quality option, following this step-by-step guide ensures a safe, professional installation that lasts for years.
Start gathering your tools today, verify your truck’s exact fitment requirements, and schedule a weekend for installation. Your future self will thank you every time you step into your truck without straining your legs or reaching awkwardly for the bed edge.
Related reading: How To Install A Tonneau Cover Step By Step
Further reading: pickup truck bed (Wikipedia)
Gear Worth Considering
A couple of real products that fit directly with what this guide covers:
This 1/2, 3/8, and 1/4 inch drive set complements your socket wrench to properly tighten running board brackets and mounting bolts to spec.
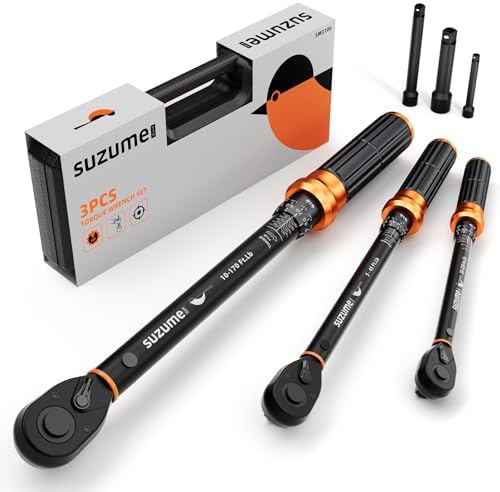
- [MATERIAL] SUZUME torque wrenches are made of CR-V steel to ensure the durability of the torque wrench. The surface is a…
- [HIGH ACCURACY] The SUZUME 3PCS torque wrench set multiple sizes, covering torque wrench 1/2 drive,torque wrench 3/8 dri…
- [LOUD CLICK] SUZUME torquimetro are designed with a bi-directional ratchet head that makes it easy to apply precise torq…
This mount kit provides the vehicle-specific hardware needed to securely attach running boards during the DIY installation process described here.
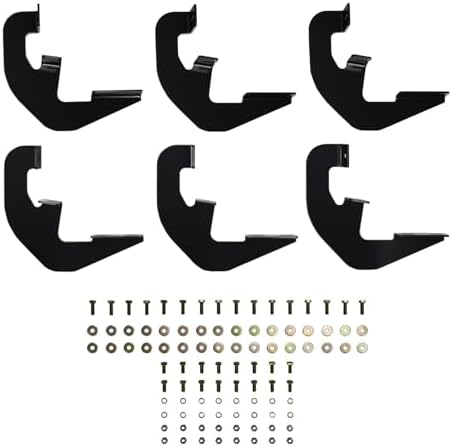
- Product Type :Auto Part
- Package Dimensions :11.1 Cm L X28.4 Cm W X40.1 Cm H
- Country Of Origin :China

🛠️ Buying Gear for Your Work Truck?
A free Amazon Business account gets you bulk pricing, tax-exempt purchases, and business-only deals on tools, racks, and truck accessories.
Create Free Amazon Business AccountAs an Amazon Associate we earn from qualifying purchases.