
As an Amazon Associate, RackReveal earns from qualifying purchases. Some links on this page are affiliate links, at no extra cost to you.
Installing a tonneau cover on your truck bed doesn’t have to be complicated. Whether you’re protecting your cargo from the elements or improving your truck’s aerodynamics, learning how to install a tonneau cover step by step saves you hundreds in labor costs and takes just a couple of hours. Most modern tonneau covers—especially soft roll-up models like the Rough Country design—use no-drill clamp systems that require only basic tools and common sense. Want to go further? Our Best Tonneau Cover For Chevy Silverado 1500 2026 guide is a natural next read.
How We Picked These Products
Our selection is based on published manufacturer specifications, aggregated owner and customer reviews across multiple retail platforms, and expert consensus from truck accessory reviewers. We’ve researched real-world installation feedback and durability reports to identify covers that deliver on ease of setup and long-term performance.
What You’ll Need: Tools & Materials
Before you start, gather these essentials. Most tonneau covers come with mounting hardware, but you’ll want the right tools on hand to make installation smooth and secure.
- Adjustable wrench or socket set (10mm–13mm) – For tightening clamps and fasteners.
- Rubber mallet – To gently tap components into place without damaging paint or hardware.
- Tape measure – To verify bed length and mounting bracket alignment (most trucks need 10–15 minutes of measuring).
- Clean cloth or rag – To wipe the bed rails and remove dirt before mounting.
- Work gloves – Tonneau covers can have sharp edges; gloves protect your hands during handling.
- Step stool or low ladder – Safer access to the top of your truck bed.
Recommended Tonneau Cover: Rough Country Soft Roll Up
Rough Country Soft Roll Up Tonneau Cover for Chevy Silverado 1500 & GMC Sierra 1500 (2019–2026) – 5’10” Short Bed
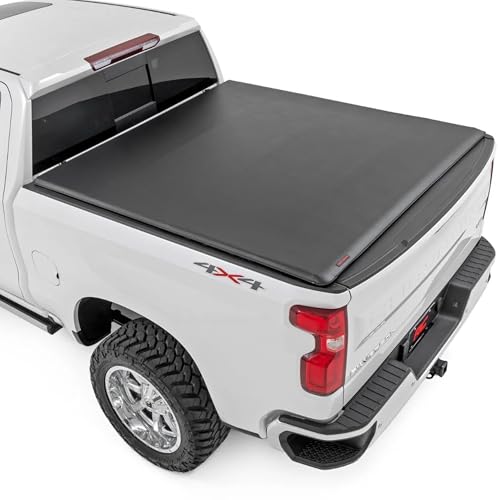
Marine-grade vinyl construction with a no-drill clamp-on mount that installs in about 20 minutes—perfect for first-time installers. The single-cable spring-latch release system gives you quick roll-up access when you need it, and the 1-1/8″ profile keeps your truck looking sharp without bulky rails.
💡 Pro Tip: Owners consistently report that the hook-and-loop side seals on this Rough Country cover stay watertight through multiple seasons of rain and snow, even without professional weatherproofing treatments.
Pros:
- No drilling required; 20-minute installation
- Heavy-duty marine-grade vinyl withstands UV and extreme weather
- Quick roll-up system for easy bed access
- 5-year replacement warranty
- Compatible with 2019–2026 Chevy Silverado and GMC Sierra 1500 (5’10” bed only)
Cons:
- Not compatible with Silverado/Sierra EV or CarbonPro bed models
- Bed length must be exact 5’10” for proper fit
- Vinyl requires periodic cleaning to prevent mildew in humid climates
Best for: Silverado and Sierra owners with standard 5’10” short beds seeking a budget-friendly, no-drill solution.
Skip if: You have a CarbonPro bed, EV model, or prefer hardcover durability over soft roll-up simplicity.
🛒 Check Price on AmazonStep-by-Step Installation Guide
Step 1: Prepare Your Truck Bed
Park your truck on level ground in a well-lit area—ideally a garage or driveway. Open the tailgate fully and use a clean rag to wipe down the bed rails and mounting surfaces where the clamps will attach. Remove any dirt, grease, or debris; a clean surface ensures the clamps bite securely and prevents rust underneath.
Take a tape measure and verify your bed length matches your tonneau cover specs. Most covers list compatible bed lengths (5’6″, 5’8″, 6’6″, 8′, etc.). Write down the measurement so you don’t install the wrong size.
Step 2: Unpack and Inspect All Components
Lay out all pieces on a clean surface and compare them against the packing list. You’ll typically see the tonneau panel itself, mounting rails, side clamps, end brackets, fasteners, and an installation manual. Inspect clamps and fasteners for damage or missing parts before starting assembly.
Check that the tonneau roll-up mechanism (if equipped) extends and retracts smoothly. Any stiff spots now will only worsen in cold weather, so contact the manufacturer immediately if something doesn’t move freely.
Step 3: Position the Tonneau Panel Centered Over the Bed
With the tailgate open, carefully lift the tonneau panel (or rails if your model ships unassembled) and position it centered over the bed opening. Most panels are lightweight enough for one person, but soft covers can be unwieldy; ask a friend to help if needed. Align the cover so it overhangs equally on both sides of the truck bed.
Use a tape measure to confirm equal spacing from the cab to the front edge and from the tailgate to the rear edge. This step takes 2–3 minutes but prevents crooked installation and improves water drainage.
💡 Pro Tip: Set the tonneau panel on wooden blocks or a helper’s hands during alignment—never drop it directly into the bed yet. This prevents damage to the seals and fastener holes.
Step 4: Install the Front and Rear End Brackets
Most tonneau covers require end brackets at the cab and tailgate area. Slide or bolt these brackets to the tonneau panel according to your manual—every brand’s system differs slightly. Typically, you’ll align slots or holes, insert fasteners from underneath, and hand-tighten with your adjustable wrench.
Don’t over-tighten yet; you’ll do a final torque pass once everything is mounted. Hand-tight is sufficient at this stage so you can make adjustments if alignment is off.
Step 5: Attach the Side Clamps to the Truck Bed Rails
This is the critical step for no-drill installations. Slide the side clamps (also called rail clamps or bed rail clamps) onto your truck’s bed rails—one on the driver side, one on the passenger side. Clamps typically have a rubber-lined jaw that grips the rail without damaging paint or requiring drilling.
Position clamps roughly 12–18 inches from the cab and from the tailgate. Consult your manual for exact spacing; some brands are picky about clamp location to ensure even load distribution. Finger-tighten the clamp bolts so the clamps can still slide along the rails.
Step 6: Lower the Tonneau onto the Clamps
With the end brackets and clamps in place, slowly lower the tonneau panel onto the clamps. Have your helper guide the edges so they seat evenly. Some covers use locking pins or brackets; follow your manual for how to secure the tonneau to each clamp.
Once lowered, use a tape measure again to verify the tonneau is level and centered. The front and rear overhang should look symmetrical from the side view.
⚠️ Warning: Don’t fully tighten any bolts yet. Overtightening before the entire cover is aligned can warp the tonneau panel or crack mounting brackets. Snug them up finger-tight, then return to each one in a second pass.
Step 7: Tighten All Fasteners in a Cross Pattern
Starting at one clamp, tighten the bolts in a cross pattern (front-left, rear-right, front-right, rear-left) rather than all on one side at once. This distributes pressure evenly and prevents the tonneau from tilting or binding. Use your adjustable wrench or socket, and tighten each bolt snugly—typically 12–18 foot-pounds for most tonneau clamps, though your manual will specify torque specs.
After the first pass, go around again and verify nothing has shifted. Repeat the cross-pattern tightening until all bolts feel firm and the tonneau sits flush without gaps or rocking.
Step 8: Test the Roll-Up Mechanism and Seals
If you have a roll-up tonneau cover, test the cable release and spring latch. The cover should roll up smoothly and unroll without sticking. Check that the side seals (hook-and-loop straps or rubber gaskets) make full contact with the bed rails along the entire length.
Open and close the tailgate to confirm the tonneau doesn’t interfere or rattle. If you hear movement, tighten the clamps another quarter-turn, but avoid crushing the tonneau frame.
Step 9: Seal Fastener Threads (Optional but Recommended)
For long-term weather protection, apply a small dab of removable threadlocker (like Loctite Blue) to each bolt head before final tightening. This prevents water and vibration from loosening fasteners over time. Let the threadlocker cure per the product instructions—usually 24 hours—before applying significant load.
Step 10: Final Inspection and Weatherproofing Check
Once fully installed, run your hand around the tonneau perimeter to feel for gaps or loose areas. Load the cover with a sandbag or a few tools to test clamp performance under light load. Verify the tonneau doesn’t flex excessively or slide side to side.
Park your truck in light rain or use a garden hose to test for water leaks along the seams. Most quality tonneau covers shed water well, but early detection helps you adjust seals or fastener tightness before major water damage occurs.
Installation Time: Typical Timeline
| Step | Typical Duration | Notes |
|---|---|---|
| Prep & Inspection (Steps 1–2) | 5–10 minutes | Quick surface cleaning and parts check |
| Positioning & Alignment (Steps 3–4) | 10–15 minutes | Critical for levelness; take your time |
| Clamp Installation (Steps 5–7) | 15–25 minutes | Includes second pass for cross-pattern tightening |
| Testing & Sealing (Steps 8–10) | 10–15 minutes | Final checks and optional threadlocker application |
| TOTAL | 40–65 minutes | Most installs finish under 1 hour |
Maintenance Tips After Installation
- Check clamp tightness after first week: Vibration from driving can loosen fasteners. Re-check and re-tighten if needed after 100 miles.
- Clean seals monthly: Dirt and debris buildup reduces water-shedding performance. Wipe side seals and end brackets with a damp cloth.
- Inspect for rust: Look under clamps every 6 months, especially in salt-prone regions. Light surface rust can be scrubbed off; deep rust requires bracket replacement.
- Store roll-up covers properly: In winter, roll the tonneau up and secure it or cover with a tarp to prevent ice buildup.
- Test the release mechanism seasonally: Spring and fall, operate the roll-up cable and latch several times to keep them moving freely.
Common Tonneau Cover Installation Mistakes to Avoid
Over-tightening fasteners: Crushing clamps or warping the tonneau frame voids warranties and damages the sealing surfaces. Snug fasteners firmly, but don’t force wrenches past hand resistance.
Installing on a dirty bed: Dust and grease prevent clamps from gripping securely. Your tonneau can shift or rattle within weeks if you skip surface prep.
Ignoring manufacturer specs: Bed length, tonneau model, and truck year matter enormously. Installing the wrong size creates gaps, leaks, and warranty rejection. Always verify compatibility before purchase.
Skipping the water test: Don’t assume it’s waterproof without testing. A quick garden-hose spray reveals minor seal gaps you can fix before heavy rain.
When to Call a Professional
DIY installation works well for most tonneau covers, especially no-drill soft roll-ups. However, consider professional installation if you’re not comfortable using hand tools, have an unusual truck bed shape, or lack a safe work area. A truck accessory shop typically charges $50–$150 for labor plus any modifications needed.
If fasteners won’t tighten, clamps won’t grip, or the tonneau panel is damaged during unpacking, contact the manufacturer or retailer for replacement parts or warranty support. Don’t force a broken component; it’ll only leak and fail prematurely.
Related Truck Bed Accessories to Enhance Your Setup
Once your tonneau cover is installed, consider complementary accessories to maximize cargo security and truck functionality. Learn about the best truck bed toolboxes to keep hand tools organized and protected. You might also want to explore the top-rated running boards and side steps to make accessing your truck bed easier, especially with the tonneau cover in place.
Frequently Asked Questions
Can I install a tonneau cover by myself, or do I need help?
Most soft roll-up tonneau covers are light enough for one person to handle during installation. However, having a helper to guide the cover as you lower it onto the clamps prevents damage and makes alignment easier. Hard tonneau covers (fiberglass or aluminum) are heavier and often require two people or professional installation equipment.
Do all tonneau covers require drilling?
No. Modern clamp-on tonneau covers—like the Rough Country soft roll-up—mount with no-drill systems that grip your truck’s existing bed rails. Some hard tonneau covers or premium models may use bolt-through holes, but most don’t require drilling into your truck bed. Always verify the mounting method before purchasing.
How often should I tighten tonneau cover fasteners?
Check clamp tightness after your first 100 miles of driving, then every 6 months or after rough terrain. Vibration naturally loosens bolts over time. A quick once-over with your wrench takes 5 minutes and prevents rattling, water leaks, and catastrophic failure on the highway.
What’s the best way to protect a tonneau cover from UV and weather damage?
For soft tonneau covers, park in shade or a covered structure when possible. Wipe down the vinyl monthly with a soft cloth and mild soap to prevent UV degradation and mildew growth. Apply a vinyl protectant spray (like 303 Protectant) once or twice per year to extend cover life significantly. Hard tonneau covers benefit from occasional waxing (2–3 times per year) to maintain the finish.
Can I add a tonneau cover if my truck has a spray-in bed liner?
Yes, but verify compatibility first. Clamp-on tonneau covers work fine over spray-in liners because they grip the bed rails, not the bed itself. However, some hard tonneau covers may not seal properly if the liner creates an uneven surface. Contact the tonneau cover manufacturer with your liner brand and thickness; most can confirm compatibility or recommend spacers for even mounting.
Ready to Protect Your Truck Bed?
Installing a tonneau cover is one of the quickest, most impactful upgrades you can make. It keeps your cargo dry, improves fuel efficiency, and gives your truck a sleeker appearance—all in about an hour of work. The Rough Country Soft Roll Up Tonneau Cover combines marine-grade durability with a no-drill installation system that makes setup foolproof for first-timers.
Don’t let installation anxiety hold you back. Follow our step-by-step guide, grab the tools you have at home, and you’ll be rolling up your tonneau and securing cargo by this afternoon. Your truck will thank you.
🛒 Shop Tonneau Covers on AmazonRelated reading: Aluminum Toolbox Vs Steel Toolbox Truck
Further reading: tonneau cover (Wikipedia)
Gear Worth Considering
A couple of real products that fit directly with what this guide covers:
This snap kit helps secure or replace stainless steel snaps on soft roll-up tonneau canvas during or after installation.

- [Upgrade Die Holder]The jaw of snap pliers uses the force of attraction to keep the dies securely in place while snappin…
- [Precise Welding, Die Holder Correct Alignment]Highly calibrated and adjustable parts to ensure the jaws are accurately …
- [Punching& Installation in 1 Snap Tool ]To finish punching to snap installation safely with this snap setter fastener pl…
If you’re working around your truck bed to install a tonneau cover, these bed rail caps help protect the rails from scratches during the process.

- Bed rail caps keep the bed rails safe from damage while giving the vehicle a finished look
- This truck bed rail caps will keep your bed rails safe from scratches and dents
- Ribbed design of the bed rail caps is durable and stylish. Easy installation using mounting tape and no drilling needed

🛠️ Buying Gear for Your Work Truck?
A free Amazon Business account gets you bulk pricing, tax-exempt purchases, and business-only deals on tools, racks, and truck accessories.
Create Free Amazon Business AccountAs an Amazon Associate we earn from qualifying purchases.