
Installing an overhead garage storage rack is one of the smartest ways to reclaim floor space and protect your tools from water damage. Whether you’re storing seasonal equipment, sports gear, or automotive accessories, a ceiling-mounted system keeps everything accessible yet out of the way. This guide walks you through every step of the installation process, from selecting the right location to securing your rack safely to the joists. You’ll learn professional techniques that take the guesswork out of setup, so you can have a fully functional storage system in just a few hours. If you’re also looking into overhead garage storage rack, our Best Overhead Garage Storage Rack 2026 guide covers it in more depth. Want to go further? Our Padded Windshield Storage Rack guide is a natural next read.
How We Picked These Products
We selected these overhead storage racks based on published manufacturer specs, aggregated owner and customer reviews from major retailers, and expert consensus from garage organization specialists. Our recommendations focus on weight capacity, ceiling compatibility, installation difficulty, and long-term durability—factors that real homeowners and truck enthusiasts consistently prioritize.
What You’ll Need Before You Start
Before you begin your overhead garage storage rack installation, gather these essential tools and materials. Most installations require basic hand tools you likely already own, but having everything ready speeds up the process significantly.
Pro Tip: Using a laser level (under $30) saves hours of alignment work and prevents uneven weight distribution that can stress your joists.
A level surface is critical for safety. Don’t skip this step, even if it seems tedious.
Essential Tools:
- Power drill with bits (3/16″ for pilot holes, countersink bits)
- Stud finder (electronic or magnetic)
- Tape measure (25-foot minimum)
- Level (at least 4 feet long)
- Socket set or wrenches for M8 bolts
- Pencil or chalk for marking joist locations
- Work gloves and safety glasses
- Step ladder or scaffold for ceiling access
Step 1: Inspect Your Garage Ceiling and Locate the Joists
The first step is identifying where your ceiling joists run and confirming their condition. Joists are the wooden beams that support your ceiling and drywall—they’re what will hold all the weight of your stored items. Use your electronic stud finder to scan the ceiling systematically, marking joist locations with pencil as you go.
Standard residential garages have joists spaced either 16 inches or 24 inches apart. Note the spacing on your garage plan—this matters because most overhead storage racks (like the FLEXIMOUNTS 4×8 system) require joists to be 24 inches apart or less. If your joists are spaced wider than 24 inches, you’ll need a different mounting strategy or a smaller unit.
Check the joists visually for signs of water damage, rot, or sagging. If you notice any soft spots when you press on the drywall, consult a structural engineer before installing a heavy rack. A compromised joist can’t safely support a 750-pound load.
Step 2: Plan Your Rack Location and Measure Twice
Position your rack away from water heaters, HVAC ducts, and electrical wiring. Leave at least 12 inches of clearance from these hazards for safety and maintenance access. Measure the width and length of your ceiling space, and account for door swings and vehicle clearance so the rack doesn’t interfere with normal garage use.
Mark the centerline of at least two joists with chalk or pencil. This marks where your mounting brackets will attach. Use your level to ensure all marks are level—any slope now becomes a wobble later. Take a photo of your marks in case you accidentally erase them during installation.
Ideally, position the rack so you can install mounting brackets into at least two full joists. This distributes the load and prevents the bracket from tearing through the wood. If your rack will straddle more than two joists, that’s even better for stability.
Step 3: Cut and Prepare Drywall for Bracket Installation
You’ll need to cut away drywall at each mounting point to expose the joists directly. Using your marks as a guide, use a drywall saw or reciprocating saw to create rectangular openings around each joist location. Most long ceiling brackets need an 8-10 inch opening per joist.
Wear a dust mask during this step—drywall dust is irritating and you’ll be working overhead. Carefully remove drywall pieces and set them aside (you can patch these later with drywall compound). Vacuum up debris before moving forward so fasteners don’t get hidden under dust.
Pro Tip: Save the drywall scraps and label them with their location. Many installers patch the ceiling after removing the rack, and matching drywall thickness makes the job cleaner.
Step 4: Install the Mounting Brackets to the Joists
Position your first mounting bracket so it straddles at least two joists. Using 3/8-inch lag bolts (typically 4 inches long), drill pilot holes into the joist wood at the bracket’s mounting points. Pilot holes prevent wood splitting and make fastening much easier. Start with a small bit, then enlarge to match your bolt diameter.
Insert lag bolts and tighten with a wrench or socket, alternating between bolts to keep the bracket level. Don’t over-tighten—you want snug contact, not crushed wood. Over-tightening can actually weaken the connection by compressing the wood fibers. Most manufacturers recommend tightening until snug, then one additional half-turn.
Install all mounting brackets following the same process. Use your level constantly to ensure each bracket is perfectly horizontal. Any tilt stresses the vertical posts and creates uneven weight distribution that can cause failure.
Recheck all bolts with your wrench after one hour of installation. Wood settles slightly as fasteners seat, and retightening ensures maximum grip strength.
Step 5: Assemble and Install Vertical Posts
Most overhead racks use adjustable vertical posts that connect the mounting brackets to the wire deck. Start by attaching the lower end of each post to its corresponding bracket using the included bolts. These are typically M8 bolts (8mm diameter), which are stronger than standard lag bolts and less prone to stripping.
Adjust post height to your desired clearance level. A 22-inch drop leaves room for tall items like storage bins; 40 inches lets you park a vehicle underneath if needed. Mark your desired height on all four posts with a pencil, then tighten all posts to that height using a socket wrench.
As you tighten each post, use your level frequently. Posts that aren’t perfectly vertical transfer load unevenly to the mounting brackets. This is the most common cause of rack sag or failure after installation—don’t skip this verification step.
Step 6: Install the Wire Deck and Cross Beams
Position the wire decking (the shelf surface) on top of the vertical posts. Most systems include cross beams that run perpendicular to the posts and support the deck. Bolt the cross beams to the posts first, ensuring they’re level and parallel to each other.
Once cross beams are secure, lay the wire deck across them. Don’t bolt it yet—first verify the entire assembly is level by placing a level on several spots across the deck surface. Any high spots indicate a post or beam that’s out of adjustment. Make small height corrections by loosening posts slightly and repositioning them.
After everything is level, bolt the wire deck to the cross beams using provided fasteners. Tighten all bolts evenly so the deck sits flat. A wavy or uneven deck won’t distribute load properly and items stored on it may slide or tip.
Step 7: Test Load and Fine-Tune
Before loading your rack with actual storage items, test it with weight. Add a gradual load—perhaps sandbags or buckets of water totaling 200 pounds—and observe the system for any movement, creaking, or shifts. Watch for several minutes to ensure stability, then add more weight incrementally.
If you notice any flex, sag, or movement during testing, stop immediately and inspect all bolts and connections. Look for bent brackets, cracked welds, or wood compression around fasteners. Tighten any loose bolts and retest. Never proceed to full-load storage if the system feels unstable.
⚠️ Safety Warning: The mounting surface must support the full rated weight. A 750-pound overhead rack places enormous stress on joists and fasteners. Never install on drywall alone—fasteners must go directly into solid wood joists.
Step 8: Organize and Load Your Rack
Plan your storage strategy before loading everything at once. Place heavier items (tools, equipment) toward the center and lower areas, lighter items at the edges and higher up. This maintains proper balance and prevents tipping.
Use storage bins and organizers to group related items. Seasonal decorations, out-of-season clothing, and rarely-used equipment are perfect for overhead racks. Tools and frequently accessed items should stay at more accessible heights. Create a simple inventory list so you remember what you’re storing.
Distribute weight as evenly as possible across the deck. If one side becomes significantly heavier than the other, uneven stress develops on mounting brackets. Rebalance periodically as you add or remove items.
Recommended Products for Your Installation
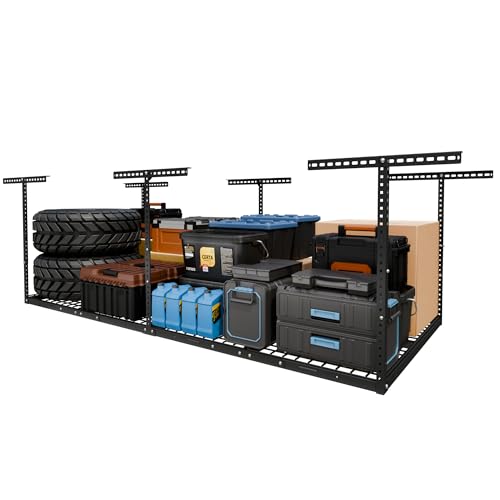
FLEXIMOUNTS 4×8 Overhead Garage Storage Rack, Adjustable Organization System
Tested to 1,200 lbs with a 750-lb rated capacity, this overhead system delivers professional-grade strength with DIY-friendly installation. The 4×8 footprint gives you up to 105 cubic feet of storage, while adjustable ceiling dropdown (22–40 inches) fits any ceiling height.
Owners consistently report: Rock-solid stability after installation and excellent instruction templates that make planning effortless. The thicker M8 fasteners and integrated structural design mean no wobbling even when fully loaded.
Best for: Homeowners with 16″ or 24″ joist spacing seeking maximum capacity in a compact footprint.
Skip if: Your garage ceiling joists are spaced wider than 24 inches (unless joists are exactly 48″ apart).
Key Specs: 96″ L × 48″ W × 22–40″ H; 750-lb rated / 1,200-lb tested; powder-coated steel; includes installation template.
🛒 Check Price on AmazonInstallation Comparison Table
| Installation Step | Estimated Time | Difficulty | Key Consideration |
|---|---|---|---|
| Joist Location & Inspection | 15–20 min | Easy | Stud finder essential; check for rot |
| Marking & Measuring | 20–30 min | Easy | Triple-check measurements; use level |
| Drywall Cutting | 30–45 min | Moderate | Wear dust mask; work overhead carefully |
| Bracket Installation | 45–60 min | Moderate | Pilot holes prevent wood splitting |
| Post Assembly & Leveling | 30–40 min | Moderate | Level constantly; vertical posts are critical |
| Deck & Crossbeam Installation | 30–45 min | Moderate | Final leveling check before tightening |
| Load Testing | 20–30 min | Easy | Gradual weight increases; watch for movement |
| Total Time (one person) | 3–4 hours | Moderate | Have a helper for deck placement |
Common Installation Mistakes to Avoid
Many DIYers rush through the leveling process and end up with racks that sag or feel unstable. This is the single most common complaint after installation. Level your posts and deck multiple times throughout the process—it takes an extra 10 minutes but prevents hours of frustration later.
Another frequent error is fastening to drywall instead of joists. Drywall alone cannot support the weight of an overhead rack no matter how many fasteners you use. Always locate joists first and verify with a stud finder.
Under-tightening bolts causes gradual loosening over weeks or months as wood settles and vibrations from the garage loosen fasteners. Tighten all bolts fully, then check them again after one week of light loading.
For more details on organizing your garage and maximizing storage, check out our guide on best garage shelving units for trucks and tools and how to choose the right storage solution for your vehicle.
Frequently Asked Questions
Can I install an overhead garage storage rack if my joists are spaced 24 inches apart?
Yes, most modern overhead storage racks are designed for 16-inch or 24-inch joist spacing, which is standard in residential garages. Verify your joist spacing with a stud finder, and confirm that your chosen rack model accommodates that spacing. If your joists are wider than 24 inches, look for racks rated for 48-inch spacing or consider installing additional blocking between joists.
What’s the difference between rated weight capacity and tested weight capacity?
Rated capacity is the safe working load—the maximum weight you should store on the rack during normal use. Tested capacity is the weight the rack survived during manufacturing testing, usually 1.6 times the rated capacity. For example, a rack tested to 1,200 lbs has a rated capacity of 750 lbs. Never exceed the rated capacity, as the tested weight is only a quality assurance benchmark, not a safe working load.
Do I need a helper to install an overhead garage storage rack?
A helper makes installation much easier, especially when positioning the wire deck and cross beams overhead. One person can install the mounting brackets and posts solo, but wrestling the deck into place while balancing on a ladder is awkward and unsafe. Recruit a friend or family member for at least the final assembly steps.
What should I store on an overhead rack versus a wall-mounted shelf?
Overhead racks are perfect for seasonal items, infrequently accessed equipment, and lightweight storage bins. Rarely-used holiday decorations, out-of-season sports gear, and spare parts are ideal candidates. Reserve wall-mounted shelves for tools and items you access regularly, as they’re easier to reach. Avoid storing anything with a strong smell or anything that might leak on an overhead rack, since spills will rain down onto your garage floor.
How often should I inspect my overhead rack after installation?
Check all bolts and fasteners one week after installation to catch any loosening from wood settling. After that, inspect quarterly or whenever you add significantly more weight to the rack. Look for bent brackets, cracks in welds, or any visible flex during these inspections. If you notice unusual movement or hear creaking sounds, stop using the rack immediately and investigate the cause before storing more items.
Ready to Reclaim Your Garage Space?
Installing an overhead garage storage rack is one of the most impactful upgrades you can make to your workspace. With this step-by-step guide, you now have the knowledge to do it safely and correctly. The key is taking your time with leveling, using proper fasteners into real joists, and distributing weight evenly once you start loading your system.
The FLEXIMOUNTS 4×8 Overhead Garage Storage Rack is a proven choice for homeowners seeking professional-grade capacity with straightforward installation. Its 750-pound rated capacity and tested 1,200-pound safety margin make it suitable for storing serious tools and equipment without worry.
Don’t let valuable garage floor space go to waste. Start your installation project this weekend and enjoy organized, efficient storage for years to come.
🛒 Shop Overhead Storage Racks on AmazonRelated reading: Thule Vs Yakima Roof Rack Which Is Better
Further reading: roof rack (Wikipedia)
Gear Worth Considering
A couple of real products that fit directly with what this guide covers:
This 4×8 ceiling rack holds up to 750 lbs and mounts to joists as described in this installation guide, keeping gear off the garage floor.

- Limited Lifetime Warranty
- 1200 lbs Tested, 750 lbs Rated: Our overhead garage storage rack undergoes rigorous 1.6 times load testing (1200 lbs) to…
- Reclaim Your Garage Space: Avoid water damage by storing your items off the garage floor. Protect your items and use gar…
This stud finder helps you locate ceiling joists accurately, ensuring your overhead garage rack is anchored securely rather than into drywall alone.

- Accurate and Rapid: The wall stud finder adopts an intelligent micro-sensor chip with the highest sensitivity which can …
- High Visibility and LCD Display: Our stud scanner is equipped with a bright, backlit LCD display that shows the center, …
- Unique Home Improvement Gifts: Our stud finder is practical and useful tool gifts for men or women who want to hang shel…

🛠️ Buying Gear for Your Work Truck?
A free Amazon Business account gets you bulk pricing, tax-exempt purchases, and business-only deals on tools, racks, and truck accessories.
Create Free Amazon Business AccountAs an Amazon Associate we earn from qualifying purchases.