
The best way to store a roof box is to find a dry, cool, and secure location where it won’t be damaged or in the way. Options include a garage, shed, basement, or even outside if properly protected. Consider wall-mounted racks, hoists, or simple stands to keep it off the floor and prevent dings.
Keeping Your Roof Box Safe When It’s Not On Your Car
So, you’ve got a roof box – your trusty travel companion for adventures! But what happens when it’s not strapped to your car, ready for a road trip? Storing a roof box can seem like a bit of a puzzle. They’re bulky, can be awkward, and you want to make sure it stays in great shape for your next getaway. Don’t worry, it’s simpler than you think! This guide will walk you through the best ways to store your roof box, keeping it safe, sound, and out of the way. We’ll cover everything from where to put it to easy DIY solutions.
Why Proper Roof Box Storage Matters
Think of your roof box like any other valuable piece of gear. If you toss it around or leave it exposed to the elements, it can get damaged.
Protection from Damage: A roof box is designed to withstand the open road, but it’s not indestructible. Improper storage can lead to scratches, dents, cracks, or warping, especially if it’s made of plastic.
Preserving its Lifespan: Taking care of your roof box means it will last longer. This saves you money in the long run because you won’t have to replace it as often.
Keeping Your Space Tidy: Roof boxes are not small! Finding a dedicated spot ensures your garage, shed, or living space doesn’t become a cluttered mess.
Safety: A precariously balanced roof box can be a hazard. Proper storage keeps it secure and prevents accidental falls.
Where to Store Your Roof Box: Top Location Ideas
Finding the right spot is key. You’ll want a place that’s out of the way but accessible enough when you need it.
1. The Garage: Your Roof Box’s Best Friend
Most garages offer the perfect environment for storing a roof box.
Dry and Protected: Garages typically shield your box from rain, snow, UV rays, and extreme temperatures, all of which can degrade the material over time.
Ample Space (Usually): Many garages have enough height and floor space to accommodate a roof box.
Security: It’s generally a more secure location than leaving it outside.
Tips for Garage Storage:
Vertical Storage: Mount it on the wall or use a hoist system to free up floor space.
Under a Workbench: If you have a sturdy workbench, you might be able to slide the box underneath.
Against a Wall: If floor storing, lean it against a wall with padding (like an old blanket) to prevent scratches.
2. The Shed: A Spacious Alternative
If your garage is packed, a garden shed can be a good alternative.
Protection: Similar to a garage, a shed provides protection from the weather.
Space: Sheds are often designed for larger items, potentially offering more room than a crowded garage.
Considerations for Shed Storage:
Security: Ensure the shed is lockable to prevent theft.
Insects and Pests: Check for any signs of rodents or insects that might nest in or on the box.
Moisture: Make sure the shed is well-ventilated and dry.
3. The Basement: Climate-Controlled Storage
Basements can be an excellent storage spot, often offering a stable temperature.
Temperature Stability: Basements tend to stay cooler in the summer and warmer in the winter, which is great for plastics.
Out of Sight: It keeps the box completely hidden from view.
Basement Caveats:
Moisture & Humidity: Basements can be prone to dampness. Ensure the area is dry, or use a dehumidifier. You might want to wrap the box in a breathable tarp if humidity is a concern.
Access: Consider how easy it will be to get the box out when you need it.
4. Outdoors (with Extra Protection): The Last Resort
Storing a roof box outdoors is generally not recommended, but if it’s your only option, you absolutely must protect it.
Full Cover: Use a heavy-duty, weatherproof tarp and secure it tightly to prevent wind from accessing it.
Elevate: Never leave it directly on the ground. Place it on blocks of wood or a pallet to allow air circulation and prevent moisture buildup.
Secure: Anchor it so it can’t be blown away or tampered with.
Location: Choose a spot that receives minimal direct sun and is not prone to flooding.
Why it’s Risky: UV rays, rain, snow, extreme temperatures, falling branches, and even curious animals can cause significant damage.
Smart Storage Solutions: How to Actually Store It
Now that you know where, let’s talk about how. These methods make storing your roof box efficient and space-saving.
Wall-Mounted Racks: Maximizing Vertical Space
This is one of the most popular and practical solutions for garages and sheds.
How it Works: You install sturdy brackets or a dedicated rack system onto your garage wall. The roof box then rests securely on these arms.
Benefits:
Space-Saving: Gets the box off the floor entirely.
Secure: Keeps the box stable and protected from accidental bumps.
Easy Access: Once installed, it’s usually straightforward to lift the box on and off.
DIY Option: You can buy pre-made roof box wall storage racks or create your own using heavy-duty lumber and L-brackets. Ensure the brackets are rated to hold the weight of your box. You can find guides on building DIY storage solutions on reputable DIY sites like This Old House for inspiration on using lumber and brackets.
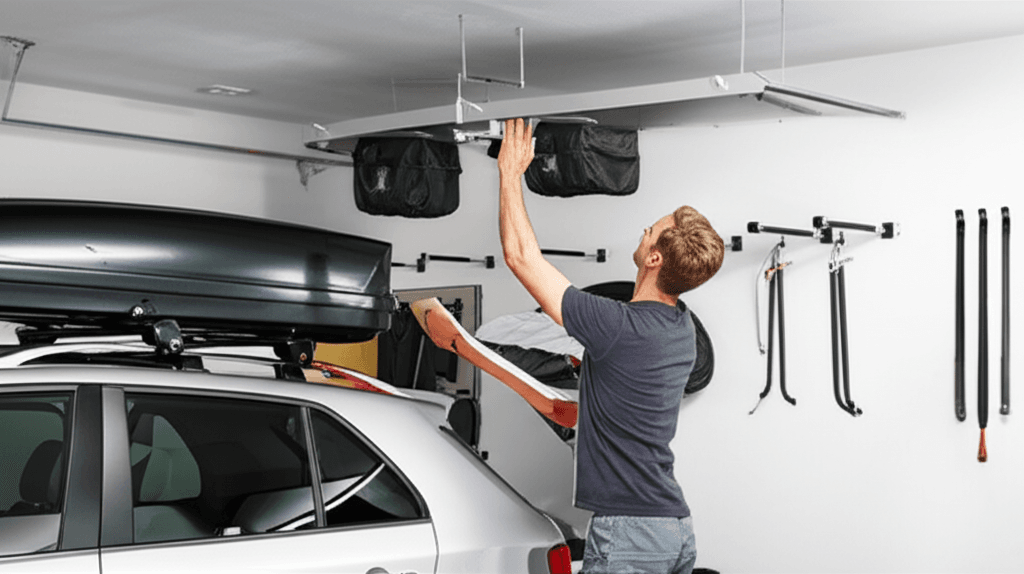
Hoist Systems: Lifting to the Ceiling
A hoist system uses pulleys and ropes to lift your roof box up to the ceiling.
How it Works: Two or more arms are attached to the underside of the roof box, and a pulley system is mounted on your ceiling. You pull a rope to lift the box.
Benefits:
Effortless Lifting: Makes it easier to get the box up high, especially if it’s heavy.
Ultimate Space Saver: Gets the box completely out of the way.
Very Secure: When properly installed, the box is held firmly above.
Considerations:
Installation: Requires secure mounting points on your ceiling joists.
Space Above: You need enough clear ceiling height.
Simple Stands or Cradles: Keeping it Elevated
If wall-mounting or hoisting isn’t an option, a simple stand can work wonders.
How it Works: This can be as simple as two sturdy sawhorses, a dedicated storage stand, or even blocks of wood. The roof box rests horizontally on these elevated supports.
Benefits:
Keeps off the Floor: Prevents moisture damage and makes it less likely to be scratched.
Easy to Build/Acquire: Inexpensive and straightforward.
Tips:
Padding: Add foam padding or old blankets to the stand to protect the box’s underside.
Stability: Ensure the stand is very stable and won’t tip over.
Storing it Upright (with Caution)
Some people store their roof boxes upright, leaning against a wall.
How it Works: The box stands on its end.
Pros:
Takes up less floor space in terms of width.
Cons:
Risk of Damage: The front or back edge could be more prone to impact or stress.
Stability: Can be less stable and more likely to tip over unless well-secured.
Not Recommended for Long-Term: Especially for boxes with hinges on the bottom when stored this way; it puts undue stress on the hinge mechanism.
If you choose this method:
Use Wall Protection: Pad the wall and the back of the box.
Secure it: Use straps or anchors to prevent it from falling.
Check Hinges/Latches: Ensure they aren’t under constant strain.
Preparing Your Roof Box for Storage
Before you tuck your roof box away, giving it a little TLC ensures it’s ready for your next adventure.
1. Clean it Thoroughly
Dirt, dust, bugs, and road grime can attract moisture and potentially damage the material over time.
Exterior: Wash it with mild soap and water. Rinse thoroughly.
Interior: Empty it completely. Wipe down the inside with a damp cloth and allow it to air dry completely before closing.
Locks and Hinges: If your box has external locks or hinges, a quick wipe-down and perhaps a tiny bit of silicone lubricant can help keep them functioning smoothly, especially if they’re exposed to the elements. Do not use oil-based lubricants on plastic parts as they can cause damage.
2. Dry it Completely
Moisture is the enemy of stored items, especially plastics and any fabric components.
Air Dry: Leave the box open in a well-ventilated area for a day or two after washing.
Check Crevices: Make sure water hasn’t pooled in any corners or seals.
3. Consider a Cover (If Storing Outdoors or in Humid Areas)
If your storage location might be a bit dusty, have potential for minor bumps, or is outdoors, a cover can be beneficial.
Breathable Tarps: Use a breathable tarp, not plastic sheeting, especially for long-term outdoor storage. This allows air to circulate and prevents condensation buildup, which can lead to mold or mildew.
Old Blankets/Sheets: For indoor storage, a soft blanket or old sheet can provide a layer of protection against dust and scratches without trapping moisture.
What NOT to Do When Storing Your Roof Box
Just as important as knowing what to do is knowing what to avoid.
Don’t Leave it Exposed to the Elements: Direct sunlight, rain, snow, and severe temperature fluctuations will shorten its lifespan and can damage the material.
Don’t Store it Directly on Concrete: Unless it’s elevated, concrete can be damp and cold, potentially leading to condensation and damage.
Don’t Force it into a Tight Space: Cramming a roof box into a space where it’s stressed or bent can cause warping or cracks.
Don’t Hang it by its Handles or Latches: These are not designed to bear the weight of the box for extended periods.
Don’t Use Harsh Chemicals for Cleaning: Stick to mild soap and water. Harsh cleaners can damage the plastic.
DIY Roof Box Storage Holders: Easy & Affordable
You don’t need to spend a lot of money to create a great storage solution.
Simple Lumber Wall Mount
Materials:
2×4 lumber (cut to appropriate lengths)
Heavy-duty L-brackets
Lag screws (for mounting to wall studs)
Screws for brackets
Measuring tape
Level
Drill
Steps:
1. Locate Wall Studs: Use a stud finder to mark the location of wall studs in your garage. This is crucial for secure mounting. The U.S. Department of Energy provides excellent resources on understanding home construction, including finding studs.
2. Cut Lumber: Cut two pieces of 2×4 to a length that will support your roof box comfortably.
3. Attach Brackets: Screw L-brackets onto the ends of each 2×4.
4. Mount to Wall: Using lag screws, securely attach the 2x4s to the wall studs, ensuring they are level and spaced appropriately for your roof box.
5. Add Padding (Optional): Wrap the lumber arms with foam padding or old carpet scraps for extra protection.
Sawhorse Stand
Materials:
Two sturdy sawhorses (pre-made or DIY)
Padding material (foam, blankets)
Steps:
1. Set up Sawhorses: Position them a suitable distance apart to support your roof box.
2. Add Padding: Cushion the top surfaces of the sawhorses where the box will rest.
3. Carefully Place Box: Gently lower the roof box onto the padded sawhorses.
Factors to Consider When Choosing a Storage Method
Available Space: How much room do you realistically have in your garage, shed, or basement?
Weight of the Box: Some roof boxes are quite heavy, especially larger models. This might influence whether you opt for a hoist or a sturdier wall mount.
Frequency of Use: If you use your roof box often, you’ll want a solution that offers quick and easy access.
Budget: DIY solutions are often the most budget-friendly. Pre-made racks and hoists can be more expensive but might offer more convenience or a sleeker look.
Your Comfort Level with DIY: If you’re not handy, consider professional installation or simpler, ready-made solutions.
Table: Roof Box Storage Methods Comparison
| Storage Method | Best For | Pros | Cons | Cost (Est.)* | Difficulty |
|---|---|---|---|---|---|
| Wall Mounts | Garages/sheds with available wall space | Space-saving, secure, keeps box off the floor | Requires strong wall studs, may need two people to lift box | $50 – $150 | Medium |
| Hoist Systems | Garages with high ceilings, heavy boxes | Maximum space-saving, effortless lifting, secure | Needs strong ceiling joists, more complex to install, higher cost | $100 – $300+ | High |
| Stands/Cradles | Limited wall space, quick setup | Inexpensive, simple, keeps box off the floor | Uses up floor space, more prone to bumps or knocks | $30 – $100 | Low |
| Upright Storage | Very tight spaces (use carefully) | Minimal floor footprint | Stability concerns, risk of warping/damage, stress on mounting parts | $0 – $50 (DIY/kit) | Low |
| Outdoor (Tarped) | No indoor space (last resort) | Provides basic weather protection | High risk of long-term damage, requires frequent checks, unattractive | $20 – $60 | Low |
*Costs are approximate and may vary by brand, material quality, and installation requirements.
Roof Box Maintenance Beyond Storage
Proper storage is part of the care equation, but a few other maintenance tips will keep your roof box in top shape.
Inspect Regularly: Before and after each trip, give your roof box a quick once-over. Check for cracks, deep scratches, or loose fittings.
Check Latches and Locks: Ensure they are functioning correctly. Lubricate sparingly if needed with a silicone-based product suitable for outdoor/plastic use.
Keep Manual Handy: If you still have it, refer to your roof box’s manual for specific cleaning and maintenance recommendations from the manufacturer.
* Never Overload: While not strictly storage, being mindful of weight limits ensures the box itself doesn’t get stressed or damaged from within.
Frequently Asked Questions About Roof Box Storage
Here are some common questions novice roof box owners have about storing their gear.
Q1: Can I store my roof box on its side?
Storing your roof box on its side is generally not recommended for long periods. While it might save horizontal space, it can put uneven pressure on the box’s shell and potentially warp or damage it over time. It also makes it more prone to tipping. A horizontal storage method (on a rack, hoist, or stand) is usually safer and better for the box.
Q2: Is it okay to store my covered roof box outside?
Storing a roof box outside, even when covered with a tarp, is risky. While a good quality, breathable tarp offers some protection, it doesn’t fully shield the box from extreme temperature fluctuations, moisture seeping in, UV degradation, or pests. It’s best used as a temporary solution if absolutely no indoor space is available. Indoor storage is always preferable for longevity.
Q3: How much weight can a wall-mounted roof box rack typically hold?
Most heavy-duty wall mounts designed for roof boxes can typically hold anywhere from 50 to 150 pounds (22 to 68 kg), sometimes even more. Always check the specific product’s weight rating. For DIY setups, use strong lumber and ensure you’re mounting directly into wall studs, which are designed to bear significant weight.
Q4: Should I lock my roof box when it’s in storage?
You don’t typically need to lock your roof box when it’s in