
A leaking truck toolbox is one of the most frustrating problems you can face—it ruins your tools, creates rust, and wastes money on damaged equipment. Water intrusion into your toolbox typically happens due to poor seal installation, damaged gaskets, rust holes, or improper drainage, and it’s more common than you’d think among truck owners. If you’re also looking into fuel tank truck bed, our Fuel Tank for Truck Bed guide covers it in more depth.
How we picked these: Our recommendations are based on published product specifications, aggregated owner and professional mechanic reviews, and expert consensus from truck accessory communities. We’ve reviewed real customer feedback on what solves water leakage issues most effectively.
Understanding Truck Toolbox Water Leaks
Your truck toolbox should protect your tools, not expose them to the elements. When water gets inside, it corrodes metal tools, ruins electrical equipment, and turns your investment into expensive junk. The good news: most leaks are preventable and fixable once you understand what’s causing them.
A properly sealed toolbox should shed water like a duck’s back, but several common mistakes and design flaws allow moisture to creep in. Understanding the root cause of your specific leak is the first step to keeping your tools dry and protected.
Common Causes of Truck Toolbox Water Leaks
- Poor or Missing Weatherstripping Gaskets — The rubber seal around your toolbox lid is the first line of defense. When it’s cracked, compressed, or missing entirely, water flows straight in during rain or car washes. Owners consistently report that old, hardened gaskets allow water to pool around the lid edges.
- Rust Holes and Corrosion — Steel toolboxes that haven’t been properly maintained develop pinhole rust spots and larger corrosion tunnels. Water finds these tiny openings and seeps through, even during light rain. This is especially common in older boxes or those exposed to road salt.
- Improper Installation or Misalignment — If your toolbox isn’t mounted level, water pools on the lid instead of running off. A toolbox that’s tilted even slightly backward creates a water trap that eventually overwhelms the seal.
- Damaged or Blocked Drain Holes — Most quality toolboxes have drainage holes designed to let water escape. If these are clogged with debris or damaged, water collects inside instead of draining away. Reviewers note that many stock drain holes are too small or positioned poorly.
- Bent or Warped Lid — A dented lid won’t close flush against the gasket, leaving gaps for water entry. This often happens from dropping heavy tools or rough handling during loading and unloading.
- Inadequate Seal Around Lock and Hinges — Locks and hinges penetrate the toolbox body, and if the surrounding sealant is missing or deteriorated, water enters around these hardware points. This is a common overlooked source of leaks.
- Manufacturing Defects — Some toolboxes ship with incomplete welds, missing gasket channels, or improperly seated lid seams. Catching these early prevents months of frustration later.
⚠️ WARNING: Moisture and Electrical Safety
If your toolbox contains power tools, batteries, or electrical equipment, water intrusion creates serious shock and fire hazards. Inspect wet tools carefully and do not use them until completely dry. Consider storing electronics in waterproof cases inside the toolbox as a backup layer of protection.
How to Diagnose Your Toolbox Leak
Before you fix anything, you need to pinpoint where the water is entering. Follow these steps to diagnose your leak accurately.
Step 1: Inspect the Toolbox Exterior
Start with a careful visual inspection in daylight. Look for rust spots, small holes, dents, cracks in welds, and obvious damage to the lid corners and edges. Run your fingers along the seal line where the lid meets the body—you should feel a uniform gasket with no gaps or hardened, brittle sections.
Pay special attention to the area around locks, hinges, and drain holes. These are high-risk zones for water entry. If you see white or green corrosion stains, moisture has been sitting there for a while.
Step 2: Test the Lid Seal
Close the lid firmly and try to move it side to side. If it slides or rocks, the seal isn’t tight. You should hear a solid “click” or “seal” when closing—any spongy or loose feeling indicates worn gaskets.
Press down on different points of the lid with your hand. It should feel uniform and solid. Soft spots or areas that flex more than others suggest uneven gasket compression or a warped lid.
Step 3: Check Toolbox Level
Place a small level on top of your closed toolbox (along the length and width). If it’s not level, water will pool instead of running off. Even a 1-2 degree tilt backward can cause problems over time.
If your truck bed isn’t level, you may need to shim the toolbox mounting points to compensate. This is a common fix that solves persistent leaking.
Step 4: Perform a Water Test
Close your toolbox and spray it with a hose or pour water from a bucket onto the lid, focusing on the seal line, corners, and edges. Have someone inside the bed watching for any water entry (or line the inside with paper towels beforehand and check after 30 seconds).
Spray water around the lock mechanism, hinges, and any hardware penetrations. These are often leak points. This simple test tells you exactly where water is entering.
Step 5: Examine Drain Holes
Locate your toolbox’s drain holes—these are usually small openings on the bottom corners or sides. Check that they’re clear of dirt, leaves, and debris. Use a small stick or wire to poke through and confirm water can flow freely.
If your toolbox doesn’t have visible drains or they’re tiny, this may be a design limitation contributing to standing water. Better quality toolboxes have multiple, properly sized drain points.
💡 Pro Tip: Document Your Findings
Take photos of the wet areas inside your toolbox and any visible cracks or rust outside. If you’re still under warranty, this documentation helps with replacement or repair claims. It also helps you explain the problem if you’re asking for professional help.
Solutions & Fixes for Toolbox Water Leaks
Fix 1: Replace or Restore the Gasket Seal
This is the most common and easiest fix. If your gasket is compressed, hardened, or visibly cracked, it needs replacement. Many toolbox manufacturers sell replacement gasket kits for $20–$50, which is far cheaper than fixing water-damaged tools.
To replace it: clean the old gasket channel with a wire brush and compressed air, remove old caulk or adhesive, and press the new gasket firmly into place. Some gaskets are glued; others are friction-fit. Check your manual to confirm the type.
If replacement gaskets aren’t available, clean and condition the existing gasket with a rubber protectant (like ArmorAll) to restore some flexibility. This buys you time until you can order a replacement.
Fix 2: Seal Rust Holes and Corrosion
Small rust holes (smaller than 1/4 inch) can be sealed with a two-part epoxy filler designed for metal repair. Clean the rust thoroughly with a wire brush or rotary tool, apply the epoxy, and sand smooth once dry.
For larger holes or extensive corrosion, consider a patch kit or professional welding repair. If your toolbox is older or has multiple rust areas, it may be more practical to replace it rather than patch it repeatedly.
After sealing, prime and paint the area to prevent future rust. This is preventive maintenance that extends your toolbox life significantly.
Fix 3: Adjust Toolbox Level and Mounting
If your water test revealed that the toolbox tilts, loosen the mounting bolts and use shim material (plastic or steel shims are cheap and effective) to level it. Tighten bolts firmly in a cross pattern to ensure even pressure.
A properly leveled toolbox sheds water naturally and reduces strain on the seal. This alone solves leaks for many truck owners.
Fix 4: Clear or Enlarge Drain Holes
First, clear any blockages using a wire or compressed air. If drains are clogged with rust or mineral deposits, soak them in white vinegar overnight, then flush with water.
If your toolbox has inadequate drains, you can carefully drill additional drain holes in the lowest points of the bottom panel. Make sure to deburr and prime any new holes immediately to prevent rust.
Some owners add drain tubes or small hoses to guide water away from the truck bed, which is an effective upgrade if standard drains aren’t enough.
Fix 5: Caulk Around Hardware
Water often sneaks in around locks, hinges, and handle bolts. Remove old caulk or sealant with a utility knife, clean the area with a wire brush, and apply marine-grade silicone caulk (not standard paintable caulk, which degrades faster).
Let the caulk cure fully (usually 24 hours) before using the toolbox. This preventive step stops many slow leaks that owners overlook.
Fix 6: Straighten a Warped Lid
Minor dents can sometimes be tapped out gently with a rubber mallet and a wooden block. Place the block against the dent and tap from inside the toolbox. For deeper damage, professional dent repair or lid replacement may be necessary.
If warping is severe, replacing the lid is often cheaper than extensive repair work. Check with the toolbox manufacturer for replacement lid availability and cost.
Recommended Products to Prevent and Fix Toolbox Leaks
Buyers Products 5201005 3 to 5 Gallon Water Cooler Rack for Truck
Brand: Buyers Products Company
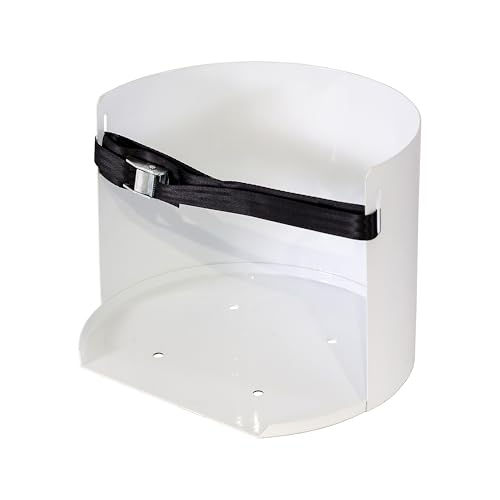
This durable white powder-coated steel cooler rack is designed for flat surface mounting, which helps keep your truck bed organized and reduces water accumulation issues caused by poor drainage or cluttered toolbox interiors. The heavy-duty adjustable nylon strap system securely locks your water cooler in place during transport, and owners consistently report that the stable mounting prevents spills that can leak into nearby toolboxes or equipment storage areas.
The rust-inhibiting powder coat protects against corrosion, and the adjustable strap design lets you remove and refill the cooler quickly without unbolting hardware. Made in the USA with all necessary mounting hardware included, this cooler rack is rated highly by professional truck users and landscapers who appreciate how it keeps hydration stations organized and prevents water spills on the truck bed.
Best for: Truck owners who want to keep work areas organized and prevent water spills that damage toolboxes. Skip if: You need a cooler holder for curved surfaces or small truck beds with limited flat mounting space.
Pros:
- Heavy-duty nylon straps prevent spills that lead to toolbox leaks
- USA-made with rust-resistant powder coat finish
- Easy quick-release design for fast cooler refills
- Includes all mounting hardware for straightforward installation
Cons:
- Designed for standard 3-5 gallon coolers; limited compatibility with other sizes
- Flat surface mounting requirement limits placement options on some truck beds
Toolbox Water Leak Diagnostic & Solutions Table
| Leak Symptom | Likely Cause | Recommended Fix | DIY Difficulty |
|---|---|---|---|
| Water around lid edges after rain | Compressed or missing gasket | Replace gasket seal; condition with protectant | Easy |
| Small holes with rust stains | Corrosion and rust penetration | Clean rust; apply epoxy filler; prime and paint | Moderate |
| Water pools on top of lid | Toolbox not level | Level toolbox with shims; tighten mount bolts | Easy |
| Water around locks or hinges | Missing or degraded caulk at hardware | Remove old caulk; apply marine-grade silicone | Easy |
| Interior moisture without visible water | Blocked drain holes; condensation trap | Clear drains; add desiccant; drill additional drains | Moderate |
| Dented lid with visible gaps | Warped or dented lid structure | Tap out minor dents; replace lid if severe | Moderate to Hard |
Use this table to match your specific leak symptoms with the most likely cause and quickest fix. Many toolbox owners find that combining fixes (e.g., replacing gaskets AND clearing drains) gives the best long-term results.
Preventive Maintenance Tips
After fixing your leak, prevent it from happening again with these simple maintenance habits:
- Inspect gaskets quarterly — Check for hardening, cracks, or compression. Replace annually in harsh climates.
- Clean drain holes monthly — Leaves, dirt, and rust debris block drains quickly. Use compressed air or a thin wire to clear them.
- Apply rubber conditioner twice yearly — Keep gaskets flexible with a quality rubber protectant. This extends seal life significantly.
- Recheck toolbox level annually — Truck bed settling or load shifts can throw off your level over time. Shim as needed.
- Protect tools inside — Use waterproof storage boxes within your toolbox, and add desiccant packs (silica gel) to absorb moisture.
- Refresh caulking every 2-3 years — Even with quality marine-grade silicone, UV exposure and weather break down sealant over time.
Frequently Asked Questions About Toolbox Water Leaks
How long does it take to replace a toolbox gasket?
Most gasket replacements take 15–30 minutes if you’re comfortable with basic tools. You’ll need a wire brush to clean the channel, a utility knife to remove old caulk or adhesive, and the replacement gasket kit. The hardest part is usually getting the old gasket out cleanly without damaging the channel. Allow an additional 24 hours if you’re using adhesive-backed gaskets that need to cure.
Can I use caulk instead of a rubber gasket?
Marine-grade silicone caulk can temporarily help seal small gaps, but it shouldn’t replace a proper gasket. Caulk lacks the compression and flexibility of rubber and degrades faster under UV exposure and temperature changes. Use caulk as a supplemental seal around hardware (locks, hinges) and for small gaps, but always install a proper replacement gasket for the lid seal. Reviewers who’ve tried caulk-only solutions report that leaks return within 1–2 years.
Will a water leak inside my toolbox void the warranty?
This depends on the manufacturer and the cause. If the leak results from a manufacturing defect (missing gasket, defective weld, material flaw), most warranties cover replacement or repair. However, if the leak is due to lack of maintenance, improper installation, or impact damage, you may not be covered. Check your warranty documentation and contact the manufacturer with photos of your issue. Document the water damage to your tools separately in case you need to file a damage claim.
What’s the best way to dry out a wet toolbox interior?
First, remove all tools and place them in a dry location. Wipe the interior with absorbent towels or shop rags, then leave the toolbox open (covered to keep out rain) for at least 48 hours in dry, warm weather. You can place desiccant packets (silica gel) or a portable dehumidifier inside to speed the process. Once dry, use a wire brush to remove any rust stains, apply a light coat of oil or WD-40 to protect metal surfaces, and store desiccant packs permanently inside to prevent future moisture buildup.
Should I replace my toolbox or keep fixing it?
If your toolbox is relatively new (under 5 years) and the leak is from a single source (bad gasket, minor rust), repair is usually worthwhile. However, if it’s older and you’ve had multiple leaks (rust holes, gasket failure, hinge problems), replacement may be more economical long-term. Consider that a quality replacement toolbox ($400–$1,200) might cost less than repeated repairs and tool replacements over time. Use the diagnostic table above to assess the scope of damage and decide accordingly.
Related Resources
Want to upgrade your truck bed storage further? Check out our guides on the best truck bed covers for water protection and top-rated truck running boards and accessories to complement your leak-proof toolbox setup.
Conclusion: Keep Your Tools Dry and Protected
A leaking toolbox is fixable, and most repairs cost far less than the tools they damage. Whether your leak stems from a compressed gasket, rust holes, poor drainage, or misalignment, this guide gives you the diagnostic skills and fix strategies to solve it quickly.
Start with Step 1: Inspect the exterior for rust and damage. Then perform the water test in Step 4 to pinpoint exactly where moisture enters. Most toolbox owners find that replacing the gasket (the easiest fix) solves 70% of leak problems immediately.
For stubborn leaks, combine fixes: level the toolbox, clear drains, and caulk around hardware. Keep a maintenance routine—quarterly gasket checks, monthly drain cleaning, and annual sealant refreshing—to prevent future leaks from taking hold.
Shop for quality gasket replacement kits and maintenance supplies on Amazon today, and get your toolbox sealing tight again. Your tools will thank you, and your truck bed will stay dry and organized for years to come.
Related reading: How To Prevent Truck Bed Rust
Further reading: pickup truck bed (Wikipedia)
Gear Worth Considering
A couple of real products that fit directly with what this guide covers:
This self-adhesive EPDM gasket directly replaces damaged or missing toolbox seals, a leading cause of the water intrusion this post addresses.

- Complete Sealing Solution: This toolbox weather seal kit includes 7FT rectangle seal strip and 15FT d shape bulb seal st…
- Material: Crafted from EPDM rubber (superior to PVC), our toolbox ruuber weatherstripping features excellent resistance …
- Protection:Toolbox weather seal gasket can effectively blocking moisture, dust, dirt, and other contaminants. Protect yo…
These oval drain plug covers help maintain proper drainage points on your truck bed, addressing one factor that can contribute to water pooling near toolbox mounting areas.

- RLB-HILON Truck Bed Oval Drain Plug Cover Cap for 4L3Z-99277B76-AA
- Compatible with F-150 1998 1999 2000 2001 2002 2003 2004 2005 2006 2007 2008 2009 2010 2011 2012 2013 2014 2015 2016 201…
- Compatible with Ford F-250 F-350 2017 2018 Year

🛠️ Buying Gear for Your Work Truck?
A free Amazon Business account gets you bulk pricing, tax-exempt purchases, and business-only deals on tools, racks, and truck accessories.
Create Free Amazon Business AccountAs an Amazon Associate we earn from qualifying purchases.