
Installing a bike rack on your truck is one of the easiest ways to transport your bicycles safely and securely. Whether you’re planning a weekend adventure or a long road trip, knowing how to install a bike rack on a truck ensures your bikes stay protected and your truck remains unencumbered. In this guide, we’ll walk you through every step of the installation process, from choosing the right rack type to securing your bikes for the journey ahead. Pair this with our Beach Cruiser Bike Rack for Car guide for the bigger picture. Want to go further? Our Best Bike Rack For Ebikes 2026 guide is a natural next read.
How We Picked These Products
We selected bike rack options based on published manufacturer specifications, aggregated owner and customer reviews across major retailers, and consensus among truck accessory experts. Our picks prioritize ease of installation, durability, and real-world usability—traits that repeat consistently in owner feedback across platforms.
What You’ll Need
Tools & Materials:
- Socket wrench set (1/2″ or adjustable wrench)
- Phillips and flathead screwdrivers
- Rubber mallet (optional, for stubborn hitch connections)
- Work gloves
- Penetrating oil (WD-40 or similar)
- Hitch pin and safety clip (usually included with rack)
Recommended Product:
MaxxHaul Hitch Mount 4 Bike Rack 150 lb Capacity Heavy-Duty Swing Down Design
Brand: MAXXHAUL
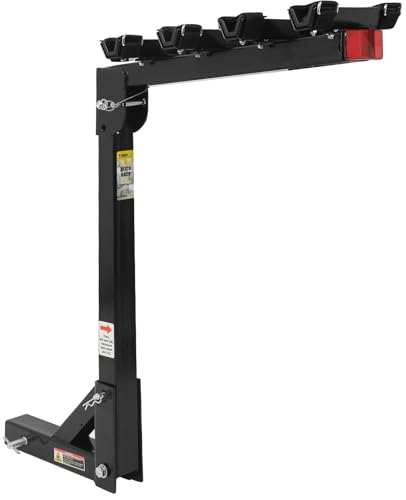
Key Features:
- Transports up to 4 bikes with 150 lb towing capacity
- Swing-down design for easy truck bed access
- Fits 2″ x 2″ hitch receivers on trucks, SUVs, vans, and sedans
- All-steel construction with powder coating for rust resistance
- Adjustable cradles and hook-and-loop straps for secure bike transport
- Includes reflector for safety during nighttime travel
Best for: Truck owners who need to transport multiple bikes and require quick access to the rear of their vehicle.
Skip if: You have a 1.25″ hitch receiver or need a roof-mounted solution.
🛒 Check Price on AmazonStep-by-Step Installation Guide
Step 1: Locate and Inspect Your Hitch Receiver
The first step in how to install a bike rack on a truck is identifying your vehicle’s hitch receiver. Get underneath the rear of your truck and look for a square metal tube welded to the frame. Most trucks have either a 1.25″ or 2″ receiver opening—check your truck’s manual or measure with calipers to confirm which size yours is.
Before installation, inspect the receiver for rust, dirt, or debris. Use a wire brush or WD-40 to clean out any obstructions, as a dirty receiver can prevent the rack from seating properly or cause a loose fit.
Step 2: Gather and Organize All Components
Unpack your bike rack and lay out all components on a clean, flat surface. Check the instruction manual carefully and verify you have the following: the main rack frame, hitch shaft, mounting bolts, bike cradles, safety pin, and any straps or accessories.
Count each piece against the manufacturer’s inventory list to ensure nothing is missing. If you’re working with a swing-down hitch rack (like the MaxxHaul model), confirm that the hinges and locking mechanisms operate smoothly before proceeding.
Step 3: Insert the Hitch Shaft into the Receiver
Wearing work gloves, take the hitch shaft (the shaft that slides into your truck’s receiver) and align it with the receiver opening. Most hitch shafts are slightly tapered, so they slide in smoothly at first and then tighten toward the end of insertion.
Slide the shaft in firmly but do not force it. If you encounter resistance about 2–3 inches from the end, you’re at the taper point—this is normal. Do not hit the shaft with a hammer at this stage. Stop when the shaft is fully seated in the receiver.
Pro Tip: If the hitch shaft feels sticky or won’t slide smoothly, apply a small amount of penetrating oil to the shaft and receiver opening. Let it sit for 2–3 minutes, then try again. Never force a stubborn hitch connection—forcing it can damage the receiver or shaft threads.
Step 4: Align the Mounting Holes and Bolt the Rack Securely
Once the hitch shaft is fully inserted, you’ll see bolt holes that need to align with corresponding holes in your truck’s receiver. Some trucks have pre-drilled holes; others may require you to use a standard hole pattern on the hitch shaft itself.
Insert the mounting bolts (usually 1/2″ diameter) through the holes and hand-tighten them first. Use a socket wrench to tighten each bolt in a cross pattern (like tightening a car wheel) to ensure even pressure. Tighten to a firm resistance, but avoid over-tightening, which can strip threads or crack welds.
Step 5: Insert and Secure the Safety Pin
Most hitch racks use a safety pin to prevent the shaft from sliding out of the receiver during transport. This pin sits in a hole between the shaft and the receiver opening. After your bolts are tightened, insert the safety pin fully and lock it in place with the attached cotter pin or clip.
Double-check that the safety pin is fully seated and the cotter pin is spread open. This is a critical safety step—a loose safety pin can result in the entire rack coming free during braking or over rough terrain.
Warning: Never drive with an unsecured hitch rack. A loose or improperly installed rack can detach on the highway, creating a dangerous hazard for you and other drivers. Before every trip, perform a safety check by hand-pushing the rack side to side and up and down to confirm zero movement.
Step 6: Attach Bike Cradles and Adjust Support Arms
With the main rack secured, you can now attach the individual bike cradles. Most modern racks feature adjustable cradles that accommodate different wheel sizes and frame styles. Loosen the adjustment bolts on each cradle and position them to fit your bikes’ wheel widths.
Ensure that the cradles are positioned at approximately the same height and that each bike frame will rest securely. For swing-down racks, test the full range of motion by swinging the rack down and back up to confirm the cradles don’t interfere with your truck’s bumper or other components.
Step 7: Load Your Bikes and Secure with Straps
Now it’s time to place your bikes on the rack. Start with the heaviest or largest bike and position it first to establish a stable base. Slide each wheel into its cradle and ensure the frame rests against the support arms without twisting or leaning at an awkward angle.
Use the provided hook-and-loop straps or rope ties to secure each bike frame to the rack. Tighten the straps snugly but not so tight that you dent aluminum frames. Leave approximately 1/4 inch of slack so you can fit a finger between the strap and frame—this prevents over-tightening while maintaining secure transport.
Step 8: Perform a Final Safety Inspection
Before driving anywhere, conduct a thorough safety check. Grab each bike individually and attempt to wiggle it side to side and forward and backward. There should be zero movement. Check all straps to ensure they’re tight and all bolts are snug.
Walk around the truck and visually confirm that the loaded rack doesn’t interfere with any lights, wiring, or moving parts. If you have a swing-down rack, test the full swing motion to confirm it doesn’t catch on the bumper or other components when fully extended.
Bike Rack Installation Comparison Table
| Installation Method | Time Required | Tools Needed | Best For | Difficulty |
|---|---|---|---|---|
| Hitch Mount (2″ receiver) | 15–20 min | Socket wrench, screwdriver | Most trucks, 4+ bikes | Easy |
| Hitch Mount (1.25″ receiver) | 15–20 min | Socket wrench, screwdriver | Smaller trucks, 2–3 bikes | Easy |
| Roof-Mounted Rack | 20–30 min | Socket wrench, drill, clips | Low-clearance garages, 2–3 bikes | Moderate |
| Bed-Mounted Rack | 25–40 min | Drill, socket wrench, clamps | Open truck beds, 2–4 bikes | Moderate |
| Tailgate-Mounted Rack | 10–15 min | Screwdriver, wrench | Quick setup, 2–3 bikes | Easy |
Pro Tips for Long-Term Bike Rack Maintenance
Inspect Regularly: Every month, remove your rack and inspect the hitch shaft, receiver connection, and all bolts for signs of rust or corrosion. Lightly sand any rust spots and apply a thin coat of grease to prevent future oxidation.
Tighten Before Trips: Before each long journey, use a socket wrench to check that all mounting bolts remain tight. Vibration from driving can gradually loosen bolts, especially on bumpy roads.
Lubricate Moving Parts: If your rack has a swing-down hinge, apply a light silicone-based lubricant to the hinges every 3–4 months. This keeps the mechanism smooth and prevents rust in the joints.
Related Truck Accessories
Once you’ve installed your bike rack, you might also want to explore other truck bed and exterior accessories to maximize your vehicle’s functionality. Check out our guides on truck roof racks for additional cargo capacity and running boards for easier truck bed access to round out your truck setup.
Frequently Asked Questions
Can I install a bike rack on a truck without a hitch receiver?
Yes, but your options are limited. Without a hitch receiver, you can install a bed-mounted rack (which bolts directly to the truck bed) or a tailgate-mounted rack (which clamps to the tailgate). Roof-mounted racks are also available, though they add height to your vehicle and may impact aerodynamics. Hitch receivers, however, are the most stable and secure mounting point, and many trucks can have one professionally installed if not factory-equipped.
What’s the difference between a 1.25″ and a 2″ hitch receiver?
The measurement refers to the inner square opening of the receiver tube. A 2″ receiver is larger and accommodates hitch shafts designed for heavier loads and larger racks. A 1.25″ receiver is smaller and typically found on smaller trucks, SUVs, and cars with lighter-duty towing needs. It’s critical to match your hitch shaft to your receiver size—a 2″ shaft will not fit a 1.25″ receiver, and attempting to force it will damage both components. Always verify your receiver size before purchasing a rack.
How much weight can a hitch-mounted bike rack hold?
Most hitch-mounted bike racks are rated for 100–150 pounds total, depending on the model and receiver class. A MaxxHaul-style rack typically supports 150 pounds, which is enough for four adult bikes (averaging 25–40 pounds each). Always check your specific rack’s weight limit and do not exceed it. Additionally, your vehicle’s hitch class (Class I, II, III, etc.) determines the maximum towing capacity—ensure your rack’s weight rating doesn’t exceed this limit.
Do I need to remove my bike rack when not in use?
It depends on your lifestyle and truck usage. Hitch-mounted racks can remain installed year-round with minimal maintenance, and many truck owners leave them attached. However, removing the rack when not in use preserves fuel efficiency (an installed rack creates aerodynamic drag), reduces stress on your hitch system, and minimizes exposure to road salt and moisture. If you install and remove your rack frequently, use a light coat of grease on the hitch shaft to prevent corrosion.
Can I open my truck’s tailgate with a hitch-mounted bike rack installed?
This depends on the rack type and your truck model. Swing-down hitch racks are specifically designed to swing away from the truck, allowing full tailgate access without removing the bikes. Fixed hitch racks and heavy-duty models may block the tailgate entirely, especially if it swings outward. Before purchasing, check the manufacturer’s specifications to confirm whether the rack is swing-compatible, and always test the motion on your truck to ensure the bikes don’t interfere with the tailgate or bumper.
Final Thoughts: Drive Safely With Your Bikes
Ready to hit the road with your bikes? Installing a bike rack on your truck is straightforward when you follow these steps carefully. The MaxxHaul Hitch Mount 4 Bike Rack is an excellent choice for most truck owners thanks to its 150-pound capacity, swing-down convenience, and easy installation. Remember to perform a safety inspection before every trip and maintain your rack regularly to ensure years of reliable performance.
For more truck accessory recommendations and installation guides, explore our complete collection of truck bed and running board products.
🛒 Shop Bike Racks on AmazonRelated reading: How To Organize A Truck Bed For Work
Further reading: roof rack (Wikipedia)
Gear Worth Considering
A couple of real products that fit directly with what this guide covers:
This hitch-mount rack fits trucks and includes the hitch pin needed for the installation steps outlined in this guide.

- Secure Bike Transportation: Safely transport up to 4 bikes with ease. The rack’s towing capacity is 150 lbs and includes…
- Convenient Swing-Down Feature: The swing-down feature provides effortless access to the rear of your vehicle, ensuring c…
- Easy Installation: Installing the MaxxHaul Towing Products 70210 Deluxe 4-Bike Hitch Mount Rack is a breeze and takes ju…
A locking hitch pin secures your hitch-mounted bike rack to the truck, adding theft protection beyond the basic hitch pin usually included.

- AMERICAN OWNED, FAMILY OPERATED – Join the Rhino USA Family and Support a Father/Son Business With the Best USA-Based Cu…
- ULTIMATE HITCH SECURITY – Anti-Theft Hitch pin Made From Solid Steel for Maximum Security. Protect Your Trailer and Hitc…
- FITS STANDARD HITCH SIZES – Our Towing Hitch Lock Fits all Class III & IV Hitches (2″ x 2″) With Ease, Providing a Secur…

🛠️ Buying Gear for Your Work Truck?
A free Amazon Business account gets you bulk pricing, tax-exempt purchases, and business-only deals on tools, racks, and truck accessories.
Create Free Amazon Business AccountAs an Amazon Associate we earn from qualifying purchases.