
Installing a truck bed liner yourself is one of the best investments you can make to protect your truck bed from scratches, rust, and damage. Whether you’re hauling tools, equipment, or cargo, a quality bed liner extends your truck’s life and maintains its resale value. In this guide, we’ll walk you through how to install a truck bed liner yourself step-by-step, covering everything from preparation to final touches so you can complete the job in just a few hours. For a closer look at can put truck bed liner over rust, see our Can You Put Truck Bed Liner Over Rust? guide.
How We Picked These Products
Our product selection is based on published manufacturer specifications, aggregated owner and customer reviews from major retail platforms, and expert consensus in the truck accessories community. We’ve researched what real truck owners report about ease of installation, durability, and long-term protection.
What You’ll Need Before You Start
Before diving into installation, gather your tools and materials. Most truck bed liners require only basic hand tools, but having the right ones on hand will make the job faster and cleaner.
Essential Tools & Materials
- Socket set or wrench set (for removing tie-downs and bed hardware)
- Screwdriver set (both Phillips and flathead)
- Utility knife or trim tool (for cutting excess material)
- Tape measure (to verify fit and placement)
- Safety glasses and work gloves (to protect hands during installation)
- Drop cloth or cardboard (to protect the truck bed during work)
- Rubber mallet (optional, but helpful for settling liners into corners)
Step-by-Step Installation Guide
Step 1: Prepare Your Truck Bed
Start by clearing your truck bed completely. Remove any loose items, toolboxes, or accessories that might be in the way. Use a vacuum or compressed air to remove dirt, sand, and debris from the corners and crevices.
Next, inspect the bed floor for any rust spots, sharp objects, or protruding bolts that could damage the liner. Sand down any rough spots with medium-grit sandpaper and wash the entire bed with mild soap and water to remove grease and grime. Let it dry completely—moisture underneath the liner can cause rust and mold over time.
Step 2: Remove Existing Hardware and Tie-Downs
Most truck beds have factory tie-down cleats, stake pocket covers, and wheel well protectors that need to be removed or adjusted before installation. Use your socket set to unbolt any hardware that protrudes into the bed space.
Keep all hardware in a labeled container so you can reinstall it after the liner is in place. Some liners come with custom mounting hardware that fits over the liner, so don’t assume you’ll lose functionality—you’re just moving things around.
Step 3: Unpack and Inspect Your Bed Liner
Carefully remove your new bed liner from its packaging and lay it flat on a clean surface. Inspect the entire piece for any cracks, tears, or manufacturing defects before installation. Most manufacturers allow returns within the first few days if damage is discovered.
If your liner is rolled or stored in a warm garage, you may want to let it sit in the sun for 30 minutes before installation. This makes the material more flexible and easier to work with, especially for spray-on or custom-fit liners.
Step 4: Position and Center the Liner
With help from a friend or family member, carefully lift the liner into the truck bed. Start by positioning it so the rear edge aligns with the tailgate opening and the sides are evenly spaced from both rails.
Use a tape measure to verify that the gap between the liner edge and truck rail is equal on both sides. This ensures your liner looks professional and provides maximum protection. Make fine adjustments now—it’s much harder to move once it’s fully settled.
💡 Pro Tip: Have a Helper on Hand
Truck bed liners are heavy and awkward to position alone. Having a second person hold one side while you guide the other ensures proper alignment and prevents damage to your truck bed rails. It also speeds up the entire process by 30–40%.
Step 5: Secure and Seat the Liner
Once the liner is centered, press it firmly into all corners and along the rails. Pay special attention to the wheel well areas, where gaps can leave your truck bed exposed. You can use a rubber mallet to gently tap the liner into tight corners without damaging it.
Walk around the truck bed and visually inspect that the liner sits evenly throughout. The goal is to eliminate any pockets of air between the liner and the bed surface, which can trap moisture and cause rust.
Step 6: Trim Excess Material and Cut Access Holes
Most drop-in liners extend slightly beyond the rear edge of the truck bed to prevent tailgate rattle. Use a sharp utility knife to carefully trim excess material flush with the tailgate opening. Cut slowly and make multiple passes rather than one deep cut, which can tear the liner.
If your liner doesn’t have pre-cut access holes for factory tie-downs or hardware, use the original bolt holes as guides. Mark the location with a marker, then carefully cut an X-shaped opening just large enough for the bolt to pass through. This preserves tie-down functionality while keeping your liner intact.
Step 7: Reinstall Hardware and Test Functionality
Now that your liner is in place, reinstall the hardware you removed earlier. Bolt the tie-down cleats back into their original positions, and make sure any stake pocket covers align properly with the liner. This usually takes just 15–20 minutes.
Test the tailgate to ensure it opens and closes smoothly without catching on the liner. Check that you can still access tie-down points and that your toolbox or other accessories fit as they did before. Some liners have a slightly raised profile, so an extra inch of clearance is normal.
💡 Pro Tip: Let It Settle for 24 Hours
After installation, avoid loading heavy cargo for at least 24 hours. The liner needs time to settle into its final position and conform completely to your truck bed. This prevents premature wear and ensures long-term durability.
Step 8: Clean and Protect Your New Liner
Wipe down your new liner with a damp cloth to remove any dust or debris from the installation process. Most truck bed liners are treated with UV protectant during manufacturing, but applying a rubber conditioner every 3–6 months will extend its lifespan and maintain its appearance.
Avoid pressure washers on high settings, as they can force water underneath the liner. Instead, use a garden hose with a standard spray nozzle or a soft brush for stubborn dirt.
Recommended Truck Bed Liner Products
Choosing the right bed liner is just as important as installing it correctly. Here’s our top recommendation for truck owners looking to install a liner themselves:
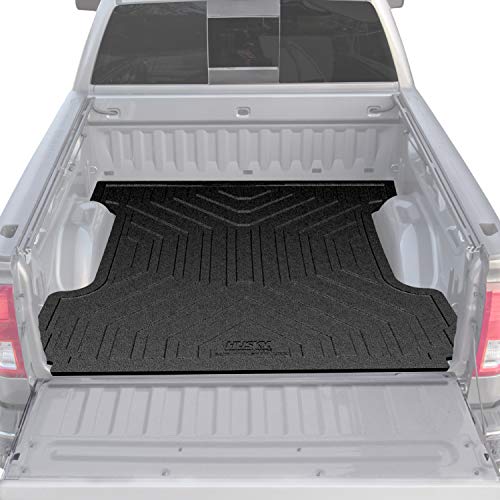
Husky Liners Custom Bed Liner | Fits 2019–2026 Chevrolet Silverado & GMC Sierra 1500 5.8′ Bed
Top Feature: No-tools installation in minutes with rubberized DuraGrip HD construction that absorbs impact and prevents cargo shifting.
Owners consistently report that this liner is one of the easiest drop-in liners to install without tools or fasteners. The custom fit means no wrinkles or gaps that expose your truck bed, and the Air Dry Nibs technology keeps moisture from getting trapped underneath. The textured anti-skid surface provides genuine traction, not just a rough feeling.
Pros:
- Zero tools required—lifts in and out in minutes
- Moisture management with air circulation design
- Durable rubberized material absorbs impact
- Custom fit eliminates side-to-side movement
- Extremely easy to clean and maintain
Cons:
- Limited to specific truck models (Chevy Silverado and GMC Sierra 1500)
- Premium price point compared to universal liners
- Not compatible with factory CarbonPro beds
Best for: Silverado and Sierra 1500 owners who want a tool-free, custom-fit liner with excellent cargo protection.
Skip if: You drive a different truck model or prefer universal liners that fit multiple vehicles.
🛒 Check Price on AmazonInstallation Timeline & Difficulty Level
| Aspect | Details |
|---|---|
| Total Time Required | 2–4 hours (depending on liner type and truck model) |
| Difficulty Level | Beginner to Intermediate (no special skills needed) |
| Tools Needed | Basic hand tools (socket set, screwdriver, utility knife) |
| Helper Required? | Highly recommended (makes work 30–40% faster) |
| Cost to Install Yourself | $0 (labor cost); $150–$500+ for the liner itself |
| Professional Installation Cost | $500–$1,200 (dealership or shop labor) |
Common Mistakes to Avoid
⚠️ Warning: Don’t Skip Surface Preparation
Installing a liner over dirt, grime, or rust will trap moisture and accelerate corrosion underneath. Always clean and dry your truck bed thoroughly before placing the liner.
Uneven Centering: A misaligned liner looks unprofessional and can cause one side to rub against the rail. Use a tape measure to verify equal gaps on both sides before tightening hardware.
Installing Immediately After Delivery: Liners shipped in cold conditions can be stiff and difficult to fit. Letting it warm to room temperature for 30 minutes makes installation much easier.
Overloading Before 24 Hours: The liner needs time to settle into its final position. Wait at least a day before hauling heavy cargo.
Forgetting to Access Bolt Holes: If you don’t cut openings for your tie-down bolts, you’ll lose that functionality and may damage the liner when you try to use it later.
Related Truck Bed Accessories You Might Need
Once your bed liner is installed, consider these complementary accessories to maximize truck bed protection and functionality:
- Best truck bed toolboxes and storage solutions — Organize cargo and protect valuables while your liner safeguards the bed floor
- Top-rated truck bed covers and tonneau covers — Add weatherproof protection and improve aerodynamics
- Truck running boards and side steps — Make loading and unloading easier and safer
- Bed rail protectors and corner guards — Prevent cargo from shifting and damaging the liner edges
Frequently Asked Questions
Can you install a truck bed liner without removing the tailgate?
Yes, most drop-in liners can be installed with the tailgate closed. However, removing the tailgate gives you better access to the rear of the bed and makes alignment and trimming easier. If you’re comfortable working around the tailgate, you can skip this step.
How long does it take to install a truck bed liner?
Most DIY installations take 2–4 hours from start to finish, depending on the liner type, your truck model, and whether you have a helper. Drop-in liners like the Husky Liners model are faster (often 1–2 hours), while spray-on liners require curing time and professional application. Starting with bed prep, you should plan for a full afternoon project.
What’s the difference between drop-in liners and spray-on liners?
Drop-in liners are ready-made rubber or plastic pieces that you lower into your truck bed—they’re fast, reversible, and DIY-friendly. Spray-on liners are applied by professionals using an applicator, creating a seamless protective coating that bonds to your truck bed. Spray-on liners are more durable and permanent but cost 2–3 times more and require professional installation.
Do bed liners cause rust underneath if moisture gets trapped?
Yes, moisture trapped under a liner can accelerate rust, which is why proper surface preparation is critical. Quality liners like the Husky Liners feature Air Dry Nibs that elevate the liner and allow air circulation to keep both the bed and liner dry. Always clean and dry your truck bed before installation, and avoid storing the truck in enclosed spaces with high humidity.
Can you remove a drop-in bed liner and reinstall it later?
Absolutely—that’s one of the biggest advantages of drop-in liners. You can remove it anytime for cleaning, truck bed inspection, or if you’re selling your truck. However, each time you remove and reinstall it, you risk damaging the material or misaligning it. If you plan to move it frequently, mark the placement with tape so it goes back in the same position.
Final Thoughts: You’ve Got This
Installing a truck bed liner yourself is easier than you think, and you’ll save hundreds of dollars in professional installation fees. With just a few basic tools, a clean truck bed, and a willing helper, you can have a fully installed liner protecting your investment in 2–4 hours.
The key is taking your time during the prep phase—clean your truck bed thoroughly, remove all hardware carefully, and verify alignment before finalizing placement. Once the liner is settled, your truck bed will be protected from scratches, rust, and weather damage for years to come.
Ready to Install Your Truck Bed Liner?
Browse our top-rated bed liner products and get everything you need delivered straight to your door. Whether you drive a Silverado, Sierra, Ford F-150, or another truck model, we’ve got the perfect liner for your truck bed.
🛒 Shop Truck Bed Liners on AmazonRelated reading: Can You Use A Toolbox With A Tonneau Cover
Further reading: pickup truck bed (Wikipedia)
Gear Worth Considering
A couple of real products that fit directly with what this guide covers:
This 5-piece drop-in liner suits DIYers seeking a custom-fit, tool-free alternative to spray-in liners for a 2019-2026 Ram 1500 5’7″ bed.

- CUSTOM FITMENT | Fits 2019-2026 Ram 1500, 5’7″ Bed (Does not fit trucks with RamBox bed)
- LOCKS IN TIGHT. LIFTS OUT EASY. | Heavy‑duty side panels lock tight into a durable ProGard bed floor to deliver strength…
- PROVEN PROGARD MATERIAL. | The ProGard bed floor packs a tough, wear‑resistant surface that protects your gear and clean…
This attachment kit provides the screws, retainers, and tie-down covers needed to secure your bed liner during a DIY installation.

- Includes everything needed to attach your bed liner
- Keeps your bed liner in place
- GM Genuine Parts are designed, engineered and tested to rigorous standards, and are backed by General Motors

🛠️ Buying Gear for Your Work Truck?
A free Amazon Business account gets you bulk pricing, tax-exempt purchases, and business-only deals on tools, racks, and truck accessories.
Create Free Amazon Business AccountAs an Amazon Associate we earn from qualifying purchases.