Roof Rack Attachment: Your Essential Guide to Secure and Effortless Mounting
Navigating the great outdoors or simply needing extra cargo space for your adventures often leads to the consideration of a roof rack. But for many, the idea of roof rack attachment can seem daunting – a complex puzzle of bars, clamps, and adjustments. Fear not! This comprehensive guide is designed to demystify the process, ensuring you can confidently and securely attach your roof rack, unlocking a world of carrying possibilities. Whether you’re a seasoned adventurer or a weekend warrior, understanding the nuances of roof rack attachment is key to a safe and enjoyable journey.
Understanding the Basics of Roof Rack Attachment
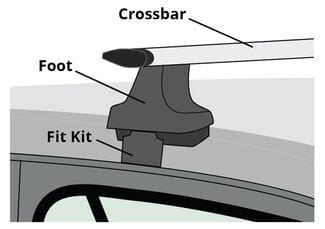
Before diving into the specifics of your vehicle and rack type, it’s crucial to grasp the fundamental principles of roof rack attachment. At its core, a roof rack system consists of two primary components: the crossbars, which run horizontally across your vehicle’s roof, and the towers or feet, which connect the crossbars to your vehicle’s specific mounting points. The stability and security of your entire setup depend on the strength and correctness of this connection. Different vehicles offer various attachment points, each requiring a specific type of fitting kit to ensure a snug and reliable fit.
Common Roof Rack Attachment Methods
The method of roof rack attachment will vary significantly depending on your vehicle’s roof design. For instance, vehicles with factory-installed raised railings, often seen on SUVs and wagons, typically utilize clamps that grip the underside of the railing. These are generally straightforward to install. Flush railings, where the railing sits directly on the roof without a gap, require specialized feet that conform to the railing’s shape.
Another common attachment method is for vehicles with pre-drilled mounting points, often hidden under small plastic covers. These points are specifically designed to receive the feet of a roof rack, offering a very robust and integrated connection. For cars without any factory-provided mounting options, such as sedans or some hatchbacks, the roof rack attachment often relies on a clip or hook system. These clips attach to the inside edge of your vehicle’s door frame, with the feet of the rack resting on the roof. This method requires careful selection of the correct clips to avoid any damage to your vehicle’s paintwork or door seals.
Finally, some vehicles have a bare roof configuration. In these cases, roof rack attachment uses a system where the feet are directly supported by the curved surfaces of the roof, with very specific considerations for padding and grip to prevent slippage and protect the vehicle’s finish. It’s imperative to consult your vehicle’s owner manual and the roof rack manufacturer’s instructions to determine the most appropriate attachment method for your specific car.
Steps for a Secure Roof Rack Attachment
Achieving a secure roof rack attachment is a multi-step process that demands attention to detail and adherence to manufacturer guidelines. Here’s a general breakdown:
1. Identify Your Vehicle’s Roof Type: As discussed, knowing whether you have raised rails, flush rails, fixed points, or a bare roof is the first crucial step. This will dictate the type of feet and fitting kit you need.
2. Select the Correct Roof Rack System: Manufacturers offer various systems tailored to different vehicles. Ensure your chosen rack is compatible. This often involves using a vehicle selector tool on the manufacturer’s website or consulting with a specialist.
3. Gather Your Tools: Most roof rack installations require basic hand tools like a measuring tape, a level, and possibly a torque wrench. Many systems come with their own specialized tools.
4. Install the Feet/Towers: Follow the manufacturer’s instructions meticulously. This typically involves attaching the correct feet to the appropriate mounting points or clips for your vehicle. Pay close attention to the specified torque settings to ensure a secure fit without overtightening.
5. Attach the Crossbars: Once the feet are securely in place, the crossbars are attached. Ensure they are spaced correctly according to the roof rack manufacturer’s recommendations or your load’s requirements. Many systems have integrated measurement guides to help with this.
6. Check for Stability and Alignment: With the crossbars attached, give them a firm wiggle. There should be minimal to no movement. Use a level to ensure the crossbars are parallel to each other and square to the vehicle. Proper alignment is critical for both carrying capacity and wind resistance.
7. Tighten All Fastenings: Double-check that all bolts and clamps are tightened to the manufacturer’s specified torque. Overtightening can damage your vehicle or the rack, while undertightening can lead to a dangerous detachment.
8. Test Load (Optional but Recommended): If possible, place a light load on the rack and check for any shifting or instability before embarking on a long journey.
The Importance of Proper Roof Rack Attachment
A poorly executed roof rack attachment can have severe consequences. Firstly, it compromises your safety and the safety of others on the road. A loose rack or cargo can detach, leading to accidents. Secondly, improper attachment can cause damage to your vehicle’s paintwork, seals, or even its structural integrity. Manufacturers design their roof rack attachment systems with significant engineering to ensure weight distribution and aerodynamic efficiency. Deviating from these guidelines can negate these benefits and introduce noise or further instability.
Maintaining Your Roof Rack Attachment
Regular checks are essential to ensure your roof rack attachment remains secure over time. After initial installation, re-check all fittings after a short drive. Periodically, especially after driving in adverse weather conditions or on rough terrain, inspect the connections. Look for any signs of wear, corrosion, or loosening. Clean the contact points between the rack and your vehicle to prevent dirt and grit from compromising the grip. Most manufacturers recommend re-torquing fittings annually or as specified in their maintenance guidelines.
Conclusion: Embrace the Freedom of Secure Carrying
Mastering the art of roof rack attachment is more than just a technical skill; it’s about unlocking the full potential of your vehicle for adventure. By understanding the different attachment methods, following installation instructions diligently, and performing regular maintenance, you can ensure your roof rack is a reliable and secure extension of your car. This investment in proper roof rack attachment will grant you the freedom to transport gear, embrace new hobbies, and explore further, all with the peace of mind that your load is safely secured. Happy trails!