
As an Amazon Associate, RackReveal earns from qualifying purchases. Some links on this page are affiliate links, at no extra cost to you.
To fit a roof rack on a car without rails, you usually use a clamp-style rack: towers or feet that grip the door openings with a vehicle-specific clip or fit kit, plus crossbars. These don’t need drilling; the rack maker’s fit guide tells you if one is approved for your car. Below: the three ways to carry gear on a bare roof, how to find the right parts, step-by-step installation, and four parts that were in stock on Amazon US (ZIP 10001) when we checked. Specs come from the makers and the listings; we haven’t tested these hands-on.
Quick answer: look up your car in the rack maker’s fit guide, buy the towers or feet, the clip or fit kit for your car, and bars of the listed length, then install them at the positions the instructions give. Don’t drill your roof. For a kayak or board now and then, soft roof pads that strap through the cabin are the simplest option, within their speed and weather limits.
3 Ways to Carry Gear on a Bare Roof
| Type | How it attaches | Good for | Watch out for |
|---|---|---|---|
| Clamp-style rack (towers + clips + bars) | Clips or a fit kit grip the door openings; pads rest on the roof | Cars with an approved fit in the maker’s guide; carries bike, kayak and box mounts | Needs the exact clip or fit kit for your car |
| Fixed-point rack | Bolts to factory mounting points, often under covers or trim | Cars that have those points | Only if your car has them; follow the maker’s instructions |
| Soft roof pads | Foam pads held by straps that run through the cabin | Occasional kayak, board or canoe trips | Car fit, roof limit, speed and weather limits; straps can hum |
How to Find the Right Parts for Your Car
- Check your roof. No rails and no gutters means a bare (or “naked”) roof. Look for small covers or flaps along the roof edge: some cars hide factory mounting points there, which use fixed-point feet instead of clamps.
- Use the rack maker’s fit guide with your make, model, year and body style (sedan, wagon, 2-door or 4-door matter). It lists the towers or feet, the clip or fit kit, the bar length and the mounting positions.
- Buy a complete set. Bare-roof racks are sold in parts: Yakima’s BaseLine towers work with its JetStream, HD Bar, CoreBar and RoundBar crossbars (some bars need an adapter) and attach with vehicle-specific BaseClips; Thule’s clamp feet need a fit kit and bars, sold separately.
- Check the load limits (see below) before you choose carriers.
Step-by-Step: Installing a Clamp-Style Rack
Always follow your rack’s own instructions; the steps below show the usual order.
- Assemble on the ground. Fit the clips or fit-kit pads to the towers or feet, and the towers to the bars, as the instructions show, including any overhang setting they give.
- Clean the roof and the door openings where the pads and clips will sit.
- Measure the positions. The fit guide or instructions give where the front and rear bars go and the reference point to measure from. Mark them with masking tape.
- Set the front bar on the roof with the pads on your marks, and hook the clips into the door openings at the points the instructions show.
- Tighten as specified, in the sequence the instructions give. Use the tool supplied: Thule’s Evo Clamp listing describes a torque limiter key that shows when that foot is properly secured, and Yakima includes a tool with the BaseLine towers.
- Repeat for the rear bar, then check both bars are parallel and at the right spacing.
- Check the doors. Open and close each door: they should close and seal normally with the clips in place. If not, stop and recheck the clips and positions.
- Lock the rack (locks are often sold separately) and recheck the fit as the instructions say, including after your first drive with a load.
Don’t drill your roof yourself. If your car’s fit list calls for permanent tracks or trim removal, follow the rack maker’s instructions exactly or have a professional installer fit it.
Load Limits on a Bare Roof
Your load must stay within the lowest of these: your car’s roof load limit in the owner’s manual, the rack’s rating, and the rating of the carrier you mount. Yakima rates the BaseLine towers at up to 165 lb depending on vehicle and bar rating, and Thule lists 165 lb for the Evo Clamp foot. Count the weight of the rack, the carrier and the gear, and keep the load centered between the bars.
4 Bare-Roof Rack Parts to Consider
| Part | Type | Notes (per maker or listing) |
|---|---|---|
| Yakima BaseLine Towers (4) | Towers for bare roofs | Up to 165 lb depending on vehicle and bar; BaseClips and bars sold separately |
| Yakima JetStream Bars (50 in) | Crossbars | T-slot aero bars; pick the length your fit guide gives |
| Thule Edge Clamp | Feet for bare roofs | 75 kg listed; confirm the fit kit and bars with Thule’s fit guide |
| Soft Kayak Roof Rack Pads | Soft rack | Straps through the cabin; for boats and boards |
Yakima BaseLine Towers (Set of 4)
Towers made for cars without roof rails or gutters. Yakima says they work with JetStream, HD Bar, CoreBar and RoundBar crossbars (RoundBar and HD Bar need an adapter), adjust to a wide range of roof shapes, have 12° of pitch adjustment to level the bars, come with an install tool, and carry up to 165 lb depending on the vehicle and bar rating. You also need the BaseClips for your car (sold in pairs; two sets per car) and SKS locks if you want them.
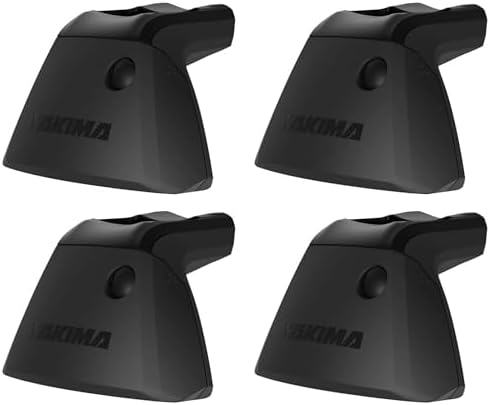
- Tailored Design: Set of 4 rack towers, crafted for cars lacking roof rails or gutters, that boast a sleek, advanced arch…
- Versatile Compatibility: Compatible with Yakima JetStream, HD Bar, CoreBar, and RoundBar crossbars, these towers offer a…
- Adaptive Adjustments: Comes with a Tri-axial DropHook clip adjustment that effortlessly conforms to various roof shapes,…
Yakima JetStream Crossbars (Set of 2, 50 in)
Aluminum aero bars with a T-slot, one of the bar types Yakima lists for the BaseLine towers. This is the 50 in size; check the bar length your car’s fit guide gives before you order.

- StreamLine Compatibility: Compatible with any Yakima StreamLine Tower, this pair of 50-inch crossbars offer versatility …
- JetFlow & SmartFill Design: Aerodynamic crossbar designed with wind tunnel tested teardrop shape for peak performance th…
- JetTruss Internal Support: Rooftop bars engineered for strength without the weight, the JetTruss internal support system…
Thule Edge Clamp
A Thule foot for vehicles without roof rack attachment points; the listing describes it as a foot for the Thule Evo roof rack system. It gives a 75 kg maximum load and reminds you to check your car’s roof load limit. Use Thule’s fit guide to confirm this foot, the fit kit for your car and the compatible bars before you buy.

- Easy-to-install foot for Thule Evo roof racks, for vehicles without pre-existing roof rack attachment points, or factory…
- Load carrier feet for Thule Evo roof rack system
- Foot installs easily onto vehicles without pre-existing roof rack attachment points
Universal Soft Kayak Roof Rack Pads
Foam pads for cars with or without side rails. The listing includes two 15 ft straps to hold the pads, two 20 ft tie-down straps for the boat, two bow and stern ropes and four quick loop straps, and lists kayaks up to 200 lb. It advises a moderate speed because higher speeds can increase strap noise, and says not to use the rack in rain, since water can run along the straps into the car. Check your car’s roof load limit too: it may be lower than the pads’ rating.

- UNIVERSAL SIZE: Fits your vehicles with or without Roof Side Rail. Perfect for carrying your kayak surfboard SUP canoe.
- TOP GRADE MATERIALS: Pads adopt UV resistant 900 denier nylon oxford fabric, heavy-duty and rugged. The pads are filled …
- EASY TO INSTALL: Includes 2 sturdy 15-ft straps to secure the pads on your vehicle, 2 durable 20-ft straps to firmly tie…
Common Mistakes
- Buying bars without the clip or fit kit. A bare-roof rack won’t attach without the vehicle-specific part.
- Guessing bar positions. Clips are shaped for specific points on the door opening; use the measurements in the instructions.
- Overtightening. Tighten only to the spec or the tool’s indicator.
- Loading past the lowest limit, or forgetting to count the rack and carrier.
- Leaving it on for no reason. Bars add drag and wind noise; see how a roof rack affects fuel economy.
Black Friday Tip and Gift Idea
Black Friday tip: run the fit guide for your car now and write down every part number: towers or feet, clips or fit kit, bar length and locks. Bare-roof racks are sold in parts, so check each deal is for the exact part and size on your list, and compare the current price.
Gift idea: soft roof pads can be a good gift for a paddler or surfer whose car has no rails. They’re sold as universal, but check the person’s car, roof limit and gear against the listing first.
FAQ
Can you put a roof rack on a car without rails?
Often, yes. Many cars without rails accept a clamp-style rack: towers or feet that grip the door openings using a vehicle-specific clip or fit kit, with crossbars on top. Use the rack maker’s fit guide to confirm an approved system for your car. Some cars have hidden factory mounting points instead, which need fixed-point feet. For occasional loads, soft roof pads that strap through the cabin are another option.
Do I need to drill holes to fit a roof rack on a bare roof?
Not for clamp-style racks: they hold on with clips at the door openings. Don’t drill your roof yourself. If a rack maker’s fit list calls for permanent tracks or a fit kit that needs drilling or trim removal, follow its instructions exactly or have a professional installer do it.
How do I know which bare-roof rack fits my car?
Use the rack maker’s fit guide with your car’s make, model, year and body style. It tells you the towers or feet, the vehicle-specific clip or fit kit, the bar length, and where to place the bars. Thule’s Evo Clamp listing says to check the Thule Buyer’s Guide, and Yakima sells BaseClips in vehicle-specific sizes.
How much weight can a bare-roof rack carry?
Use the lowest limit that applies: your car’s roof load limit in the owner’s manual, the rack’s rating, and the carrier’s rating. Yakima rates its BaseLine towers at up to 165 lb depending on vehicle and bar rating, and Thule lists 165 lb for the Evo Clamp foot. Count the rack, carrier and gear.
Will a clamp-style rack damage my door seals or paint?
Using the right clip or fit kit and installing it exactly per the instructions reduces the risk: the clips sit at the door openings and rubber pads rest on the roof. Clean the roof and pad areas first. If a clip distorts a door seal, stops a door closing normally or sits on paint where it shouldn’t, stop and recheck the parts and positions; don’t bend clips or alter seals to force a fit.
Are soft roof racks safe for highway driving?
The listing for the soft pads on this page doesn’t confirm highway use: it says higher speeds can increase strap noise and advises a moderate speed, and it says not to use the rack in rain because water can run along the straps into the car. Follow the product’s instructions, use the bow and stern lines, check the straps at every stop, and use a hard rack for regular or longer trips.
Related Guides
- Best Paddleboard Roof Rack for Cars Without Rails
- Roof Racks vs Roof Rails vs Crossbars
- Roof Rack Weight Capacity Explained
- How to Make Roof Racks Quieter
As an Amazon Associate, we earn from qualifying purchases at no extra cost to you.

🛠️ Buying Gear for Your Work Truck?
A free Amazon Business account gets you bulk pricing, tax-exempt purchases, and business-only deals on tools, racks, and truck accessories.
Create Free Amazon Business AccountAs an Amazon Associate we earn from qualifying purchases.